Whether you like to hike, climb, paddle, or sail, at some point, you’ll need to know a knot or two. Indeed, knot tying is an essential skill for any type of outdoor adventure because it allows you to do everything from pitching a tent at the campground to rappelling off a cliff after a climb.
But knot tying is also an infamously challenging skill to learn, especially if you’re a newcomer to the pursuit. Thankfully, we’re here to help.
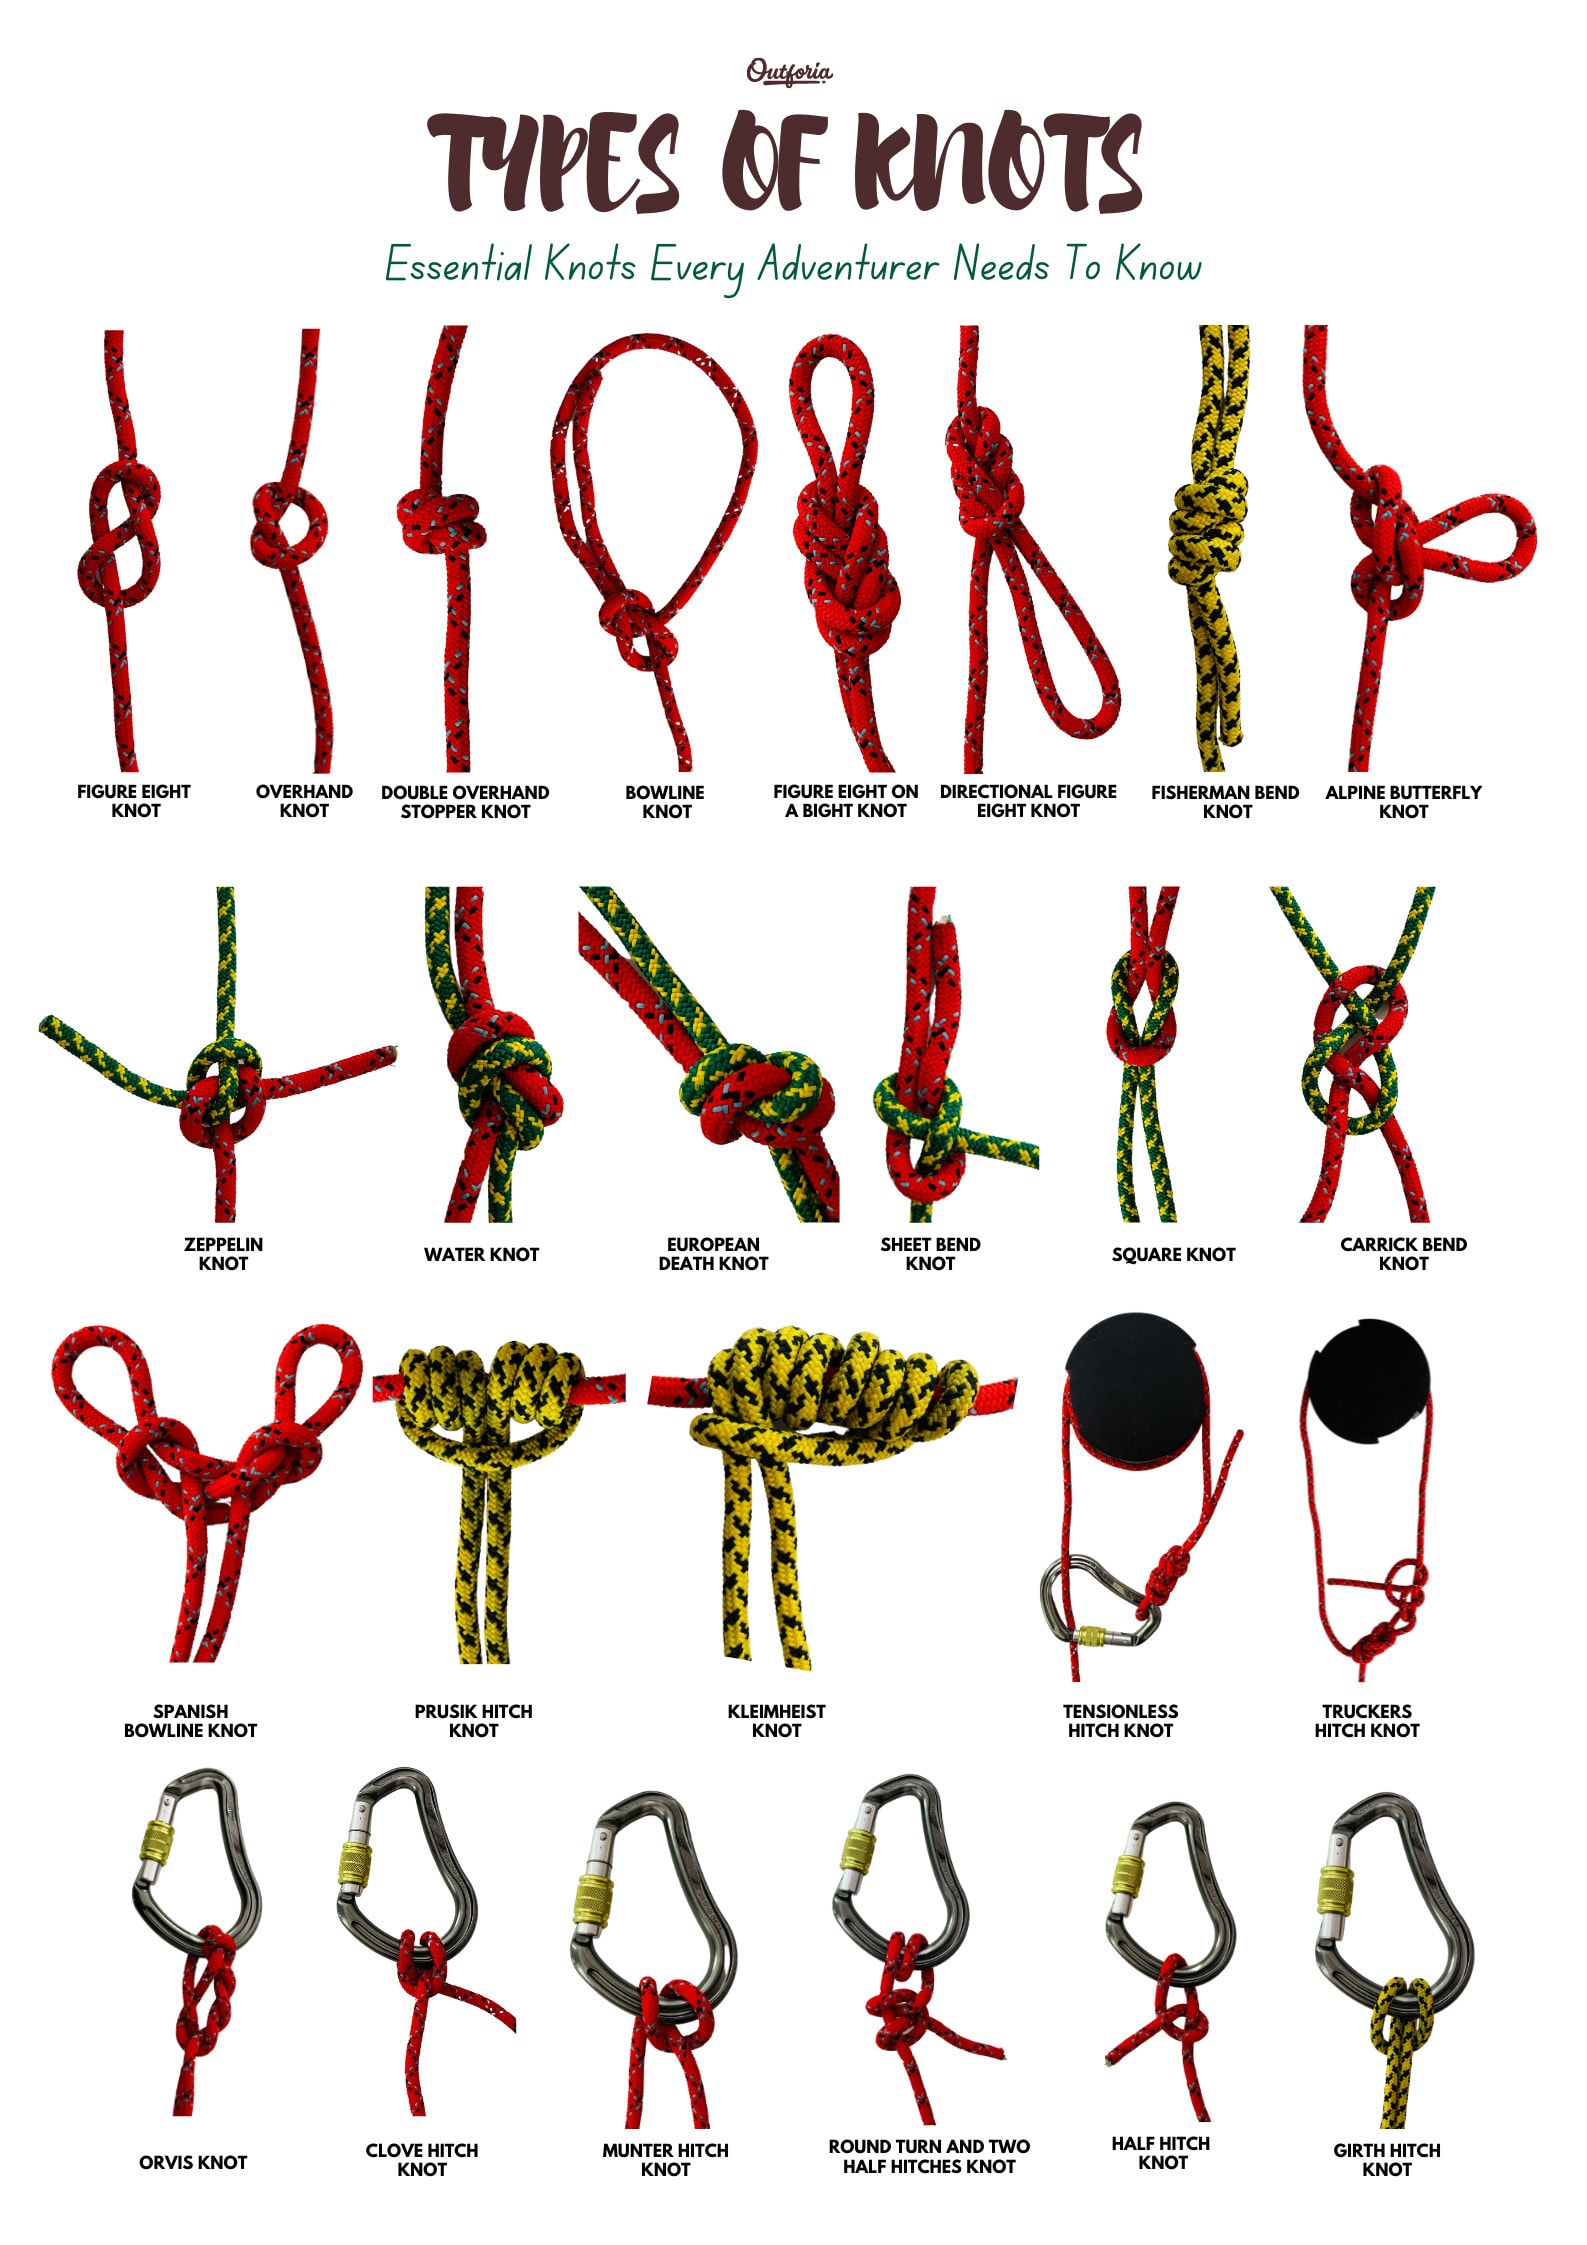
In this guide to all things knotty, we’ll introduce you to 25 types of knots that you need to know before your next great adventure.
For each knot, we’ll clue you in to the advantages and disadvantages of that method, and we’ll walk you through what you need to do, step by step, to tie a quality knot. That way, you can adventure with confidence and know that you’re a veritable knot-tying master.

Caution! Knot Tying Safety
Knot tying is a time-honored pursuit that takes hours of practice to truly master. Many of the knots that we discuss in this guide can be used for a wide range of different purposes, from tensioning a tarp at your campsite to tying up your sailboat at the dock.
In many cases, a knot isn’t a serious risk management concern. For example, if the knot in your tent’s guyline comes undone, it’s likely not the end of the world. However, in other situations, a properly tied knot is essential for your well-being. For example, the knot you use to tie-in to the rope while rock climbing is what’s responsible for protecting you in a fall.
If you’re reading this article to learn knots that you’ll use in non-life-or-death situations or just because you fancy yourself a knot-tying master, then feel free to get knotty as much as you’d like.
But, if you’re here to learn how to tie knots for rock climbing or any other situation where your knot is an important safety tool, then please be cautious with your new skills. This guide is designed to help you learn, but it is no substitute for professional instruction and experience. If you’re going climbing, please consider hiring a qualified guide or instructor to show you the ropes
You may also like: 5 Different Types of Maps – General Kinds, History of Mapmaking & Parts of a Map (Photos, Infographic and Facts)
25 Types of Knots That You Need to Know
Share this Image On Your Site
<a href="https://outforia.com/types-of-knots/"><img style="width:100%;" src="https://outforia.com/wp-content/uploads/2021/07/Graphics-Types-of-knots-outforia-0721-3.jpg"></a><br> Types of Knots Infographic by <a href="https://outforia.com">Outforia</a>In this section, we’ll introduce you to 25 popular types of knots. The knots in this guide can be used in a wide range of different activities, so there’s sure to be something in this article that will be useful in your life.
As you read through this article, it’s helpful if you have a piece of rope or cord on hand so you can practice your new skills. Cord that’s anywhere from 5 to 9 mm (0.19 to 0.35 in) thickness is usually best for practicing your knot tying skills, but anything you have available is better than nothing.
Keep in mind that nearly every knot can be tied in a number of different ways. However, we couldn’t possibly teach you every knot tying method in this article. So, we’ve selected one method for tying each of these knots for you to try.
One final thing before we dive into our list of 25 types of knots: There are a few pieces of terminology that you need to know to make the most of this guide. In particular, there are five phrases that you need to know:
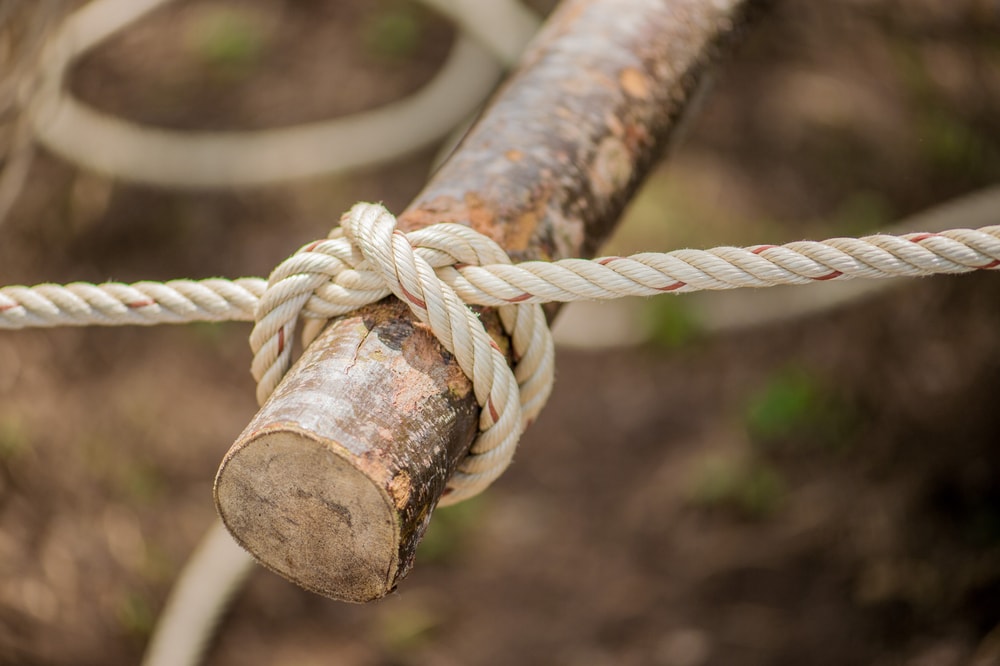
- Working End – The end of the rope, cord, line, or webbing that you use to tie a knot.
- Standing End – The end of the rope, cord, line, or webbing that you are not using to tie a knot. Some people call this the lagging end or the free end of the rope.
- Bight – A bight is a U-shaped bend in a rope.
- Loop – A loop is a U-shaped bend in a rope where the two strands of rope cross over each other. If the strands do not cross, it is a bight.
- Tail – The tail of a knot is the length of rope that’s leftover in the working end after you complete the knot. Some people call this excess rope. Note that the amount of tail you see in our knot photos is generally insufficient for actual knot tying, but it was necessary for photo quality. Always leave sufficient tail at the end of each knot.
With those key knot-tying terms out of the way, let’s turn our attention to the 25 types of knots that you need to know:
1. Square Knot
Use: Tying two ends of a rope or line together in a non-load-bearing situation. Not to be used whenever safety is important.
Pros:
- Quick and easy to tie
- Unties easily after being loaded
- The basis for many other similar knots
Cons:
- Comes undone easily
- Can fail under heavy loads
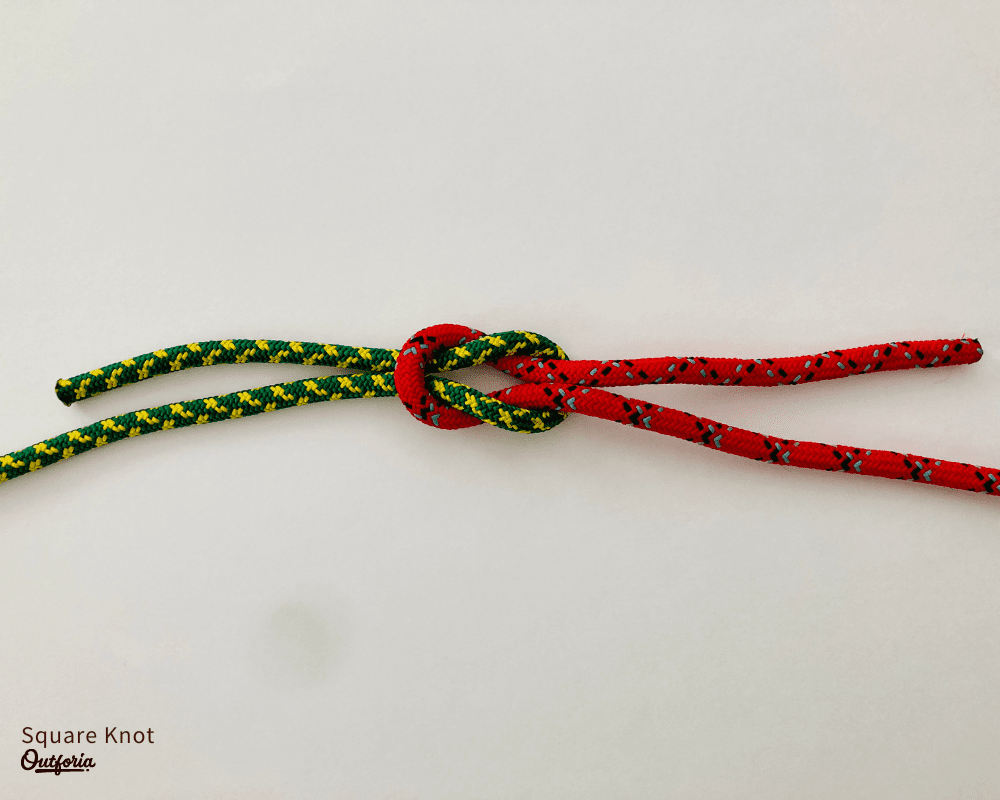
One of the most commonly tied knots in the world, the square knot is the knot that many of us actually use when we tie our shoes. In fact, we use a variation of the square knot, which is also called the reef knot, for many things in the outdoors, including for reefing a sail on a sailboat (hence the name).
The key benefit to the square knot is that it’s easy to tie and untie. However, the ease with which this knot can be untied is also one of its key drawbacks. The square knot fails very quickly under heavy loads, so it should never be used when safety is a concern. Rather, the square knot is designed for situations where you need to tie two ends of a rope together.
To tie the square knot:
- Hold two ends of rope—one in each hand. The strand in your right hand is Rope A. The strand in your left hand is Rope B.
- Cross Rope A over Rope B. Rope A should now be in your left hand.
- Cross Rope A over Rope B again. Rope A should now be in your right hand.
- Tighten both Rope A and Rope B to form the square knot.
2. Overhand Knot
Use: Forming a simple knot in any line of rope or webbing. Is used to form many other knots in what’s known as the “Overhand Knot Series.”
Pros:
- Very simple to tie
- Essential skill for forming dozens of other knots
- Great for use in webbing
Cons:
- Less reliable than many other variations
- Can be difficult to untie after being loaded
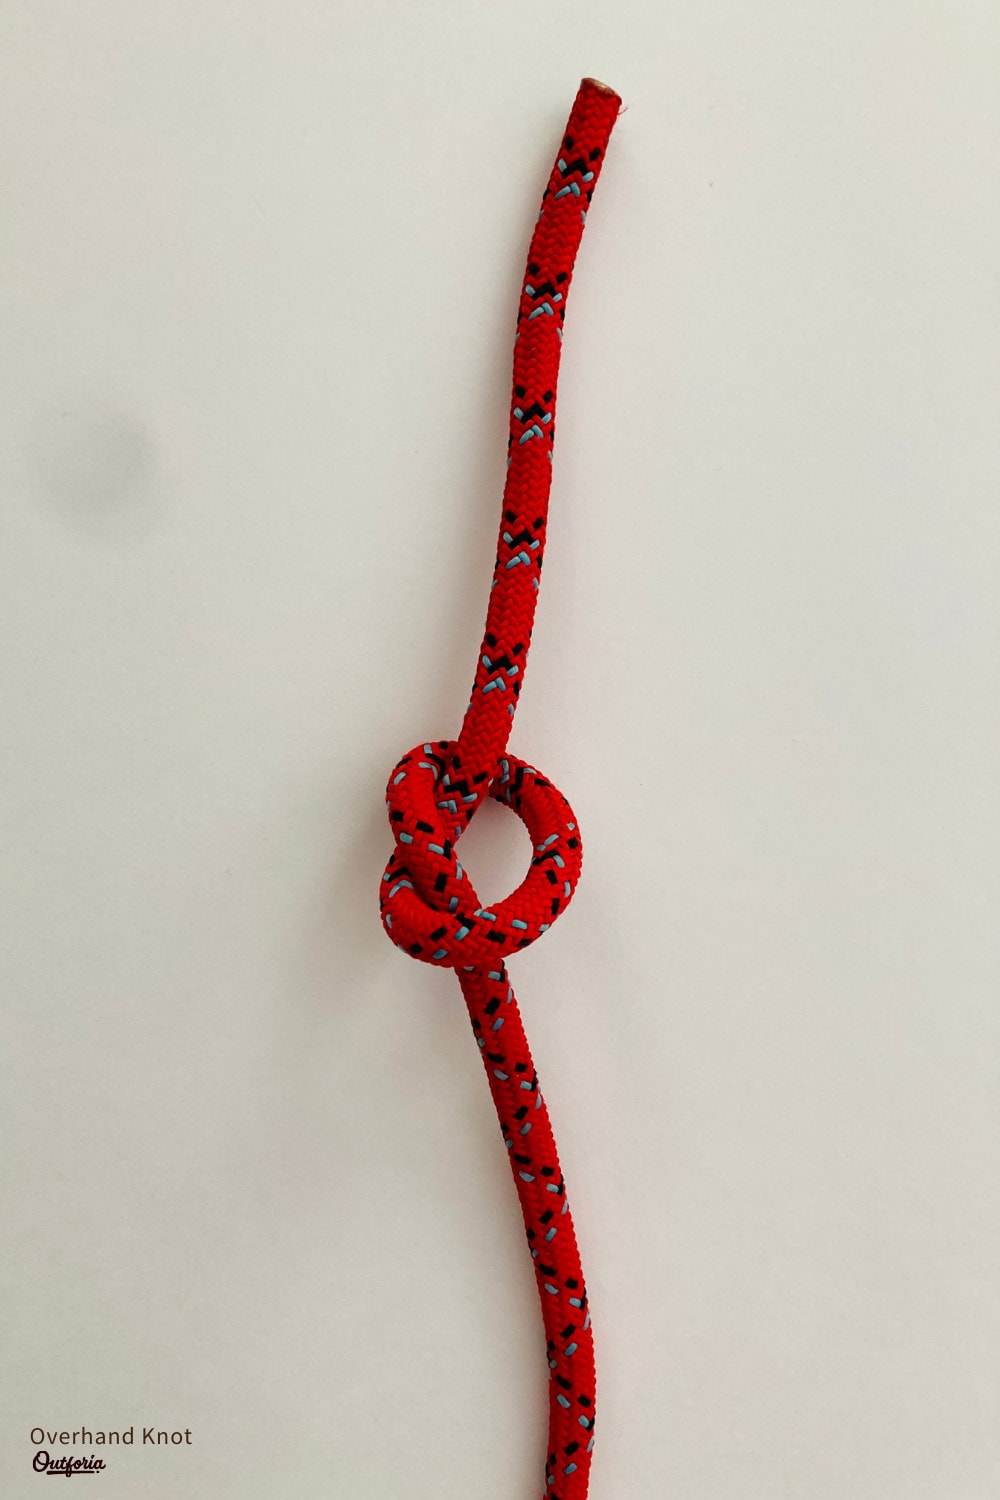
Arguably the simplest knot, the overhand knot is yet another knot that you’ve likely tied countless times in your life—even if you didn’t know what its name was.
The overhand knot is commonly used as what we call a “stopper knot,” which is a knot that prevents a rope from sliding through a carabiner, grommet, or any other piece of hardware. However, note that there are many better stopper knots out there, including the double overhand stopper knot, if you are not using webbing.
One of the benefits of learning the overhand knot early in your knot tying career is that the overhand is the basis for a slew of other knots. Therefore, learning this knot will prepare you well for your future tying endeavors.
To tie the overhand knot:
- Hold the working end of a rope in one hand
- Create a loop with the working end of the rope.
- Pass the working end through the loop
- Pull the working and standing ends of the rope to form the overhand knot.
3. Figure Eight Knot
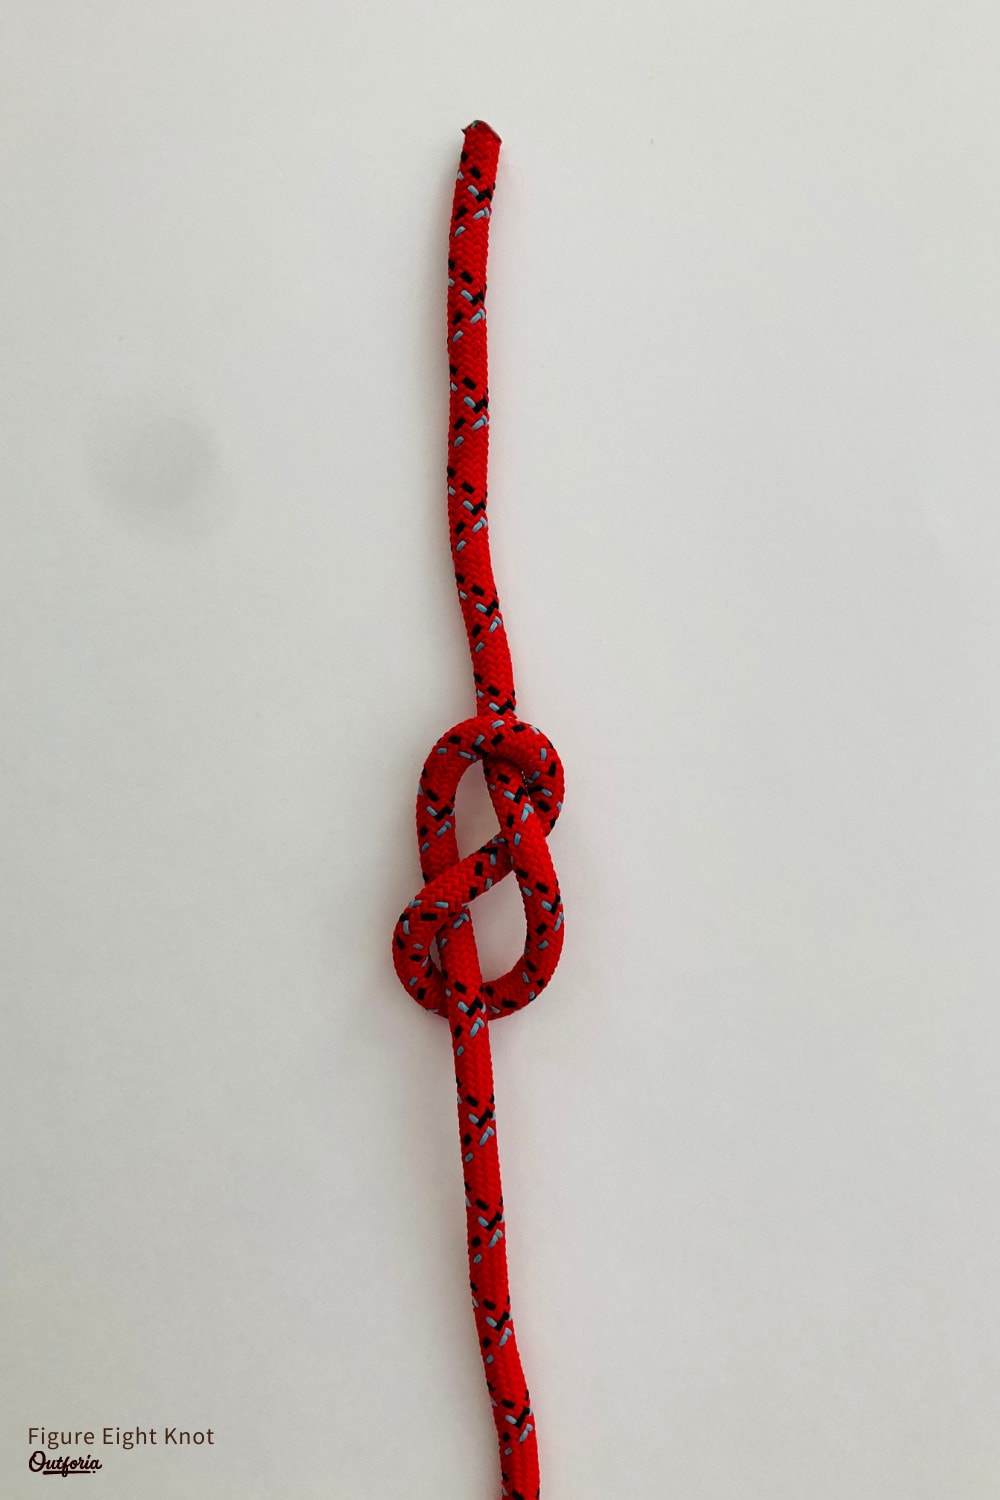
Use: A more secure alternative than the overhand knot. Very popular in rock climbing and sailing.
Pros:
- Simple and easy to tie
- Easy to inspect for proper technique
- Comes undone easily after being loaded
- The basis of many other knots
Cons:
- Requires more rope to tie than the overhand
- Can “flip” over itself and fail when used as a stopper knot
- Not ideal for use in webbing
Another fantastic stopper knot, the aptly-named figure eight knot is a fan-favorite among climbers everywhere. In fact, it’s one of the first knots climbers learn because it’s part of the figure eight follow-through knot, which is considered to be one of the best knots for tying-in to a rope when created properly.
The primary benefit of the figure eight over the overhand is that the figure eight is easier to untie, even after it’s been subjected to very heavy loads. The figure eight is also designed to tighten on itself, so it’s less likely to come undone when it’s tied with an appropriate amount of tail.
In reality, there are only two downsides to the figure eight. First, it requires more rope to tie than the overhand knot. It can also “flip” over itself when used as a stopper knot. This is not very common, especially if you leave at least 1 foot (30 cm) of space between the knot and the end of the rope. However, this type of failure is a real concern.
Also, keep in mind that, while you can tie the figure eight in webbing, doing so isn’t ideal. If you are working with webbing, consider the overhand knot, instead.
To tie the figure eight knot:
- Hold the working end of a rope in one hand
- Create a loop with the working end of the rope.
- Take the working end of the rope and pass it around the backside of the standing end.
- Pass the working end of the rope through the loop you created in step 2. This should create a figure eight shape in the rope.
- Tighten the working and standing ends of the rope to create the figure eight knot.
4. Clove Hitch
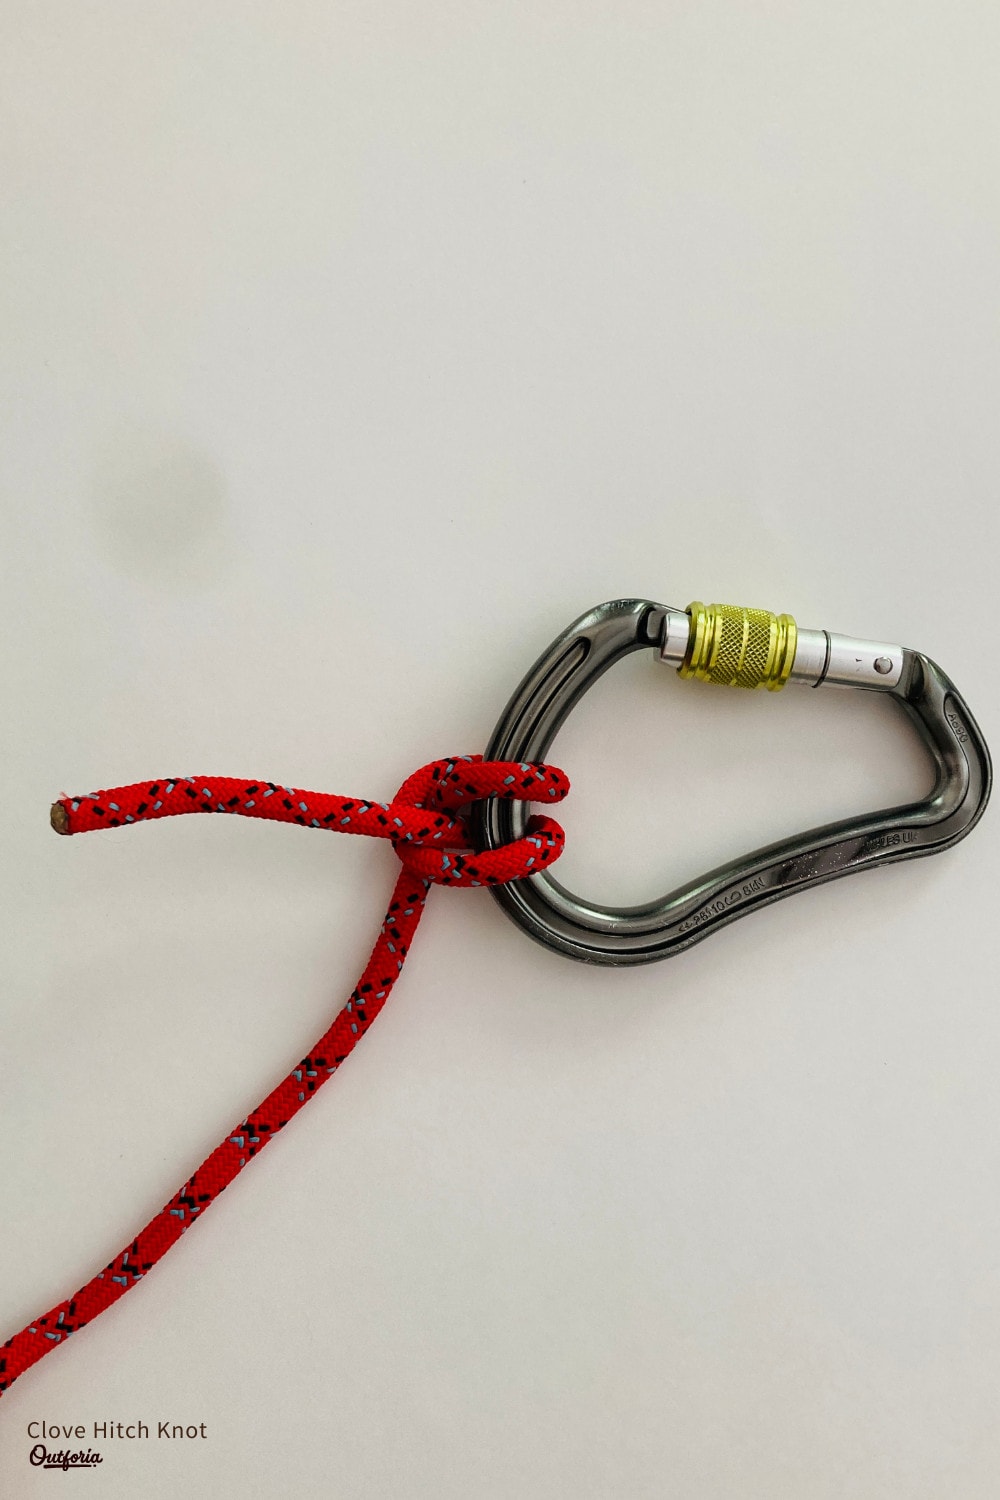
Use: Attaching rope or line to a post, carabiner, tree, or any other object. Very popular in climbing and sailing.
Pros:
- Simple to untie after being loaded
- Many ways to tie
- Can be used in load-bearing situations (with caution)
Cons:
- Can be mistaken for other hitches
- Known to slip in certain situations
An essential skill for any outdoor enthusiast, the clove hitch is used for everything from tying fenders on a sailboat to attaching tent guylines to a tree. It can be tied in a number of different ways, depending on personal preference and the situation at hand.
The biggest advantage to the clove hitch is that it is easy to untie, even after being loaded. It can also be used in load-bearing situations, such as in climbing and mountaineering, but with caution. When tied properly and with a large amount of tail on either end (think 2 feet/60 cm or more), the clove hitch is one of the most versatile tools in your knot-tying toolbox.
Keep in mind, however, that the clove hitch can be dangerous if not used properly. If the clove hitch is tied around a very smooth object (think a metal pole), it can “slip” and cause the hitch to fail. Additionally, if you tie a clove hitch around a very large object, it can also slip. However, this does not generally happen on carabiners when the hitch is tied correctly.
To tie a clove hitch around an object:
- Wrap the working end of the rope around the object.
- Cross the working end of the rope around the standing end once to form a loop.
- Wrap the working end around the object for a second time to create a second loop.
- Pass the working end through the second loop that was created in step 3.
- Pull both the working and standing end of the rope tightly to create the clove hitch.
5. Double Overhand Stopper Knot
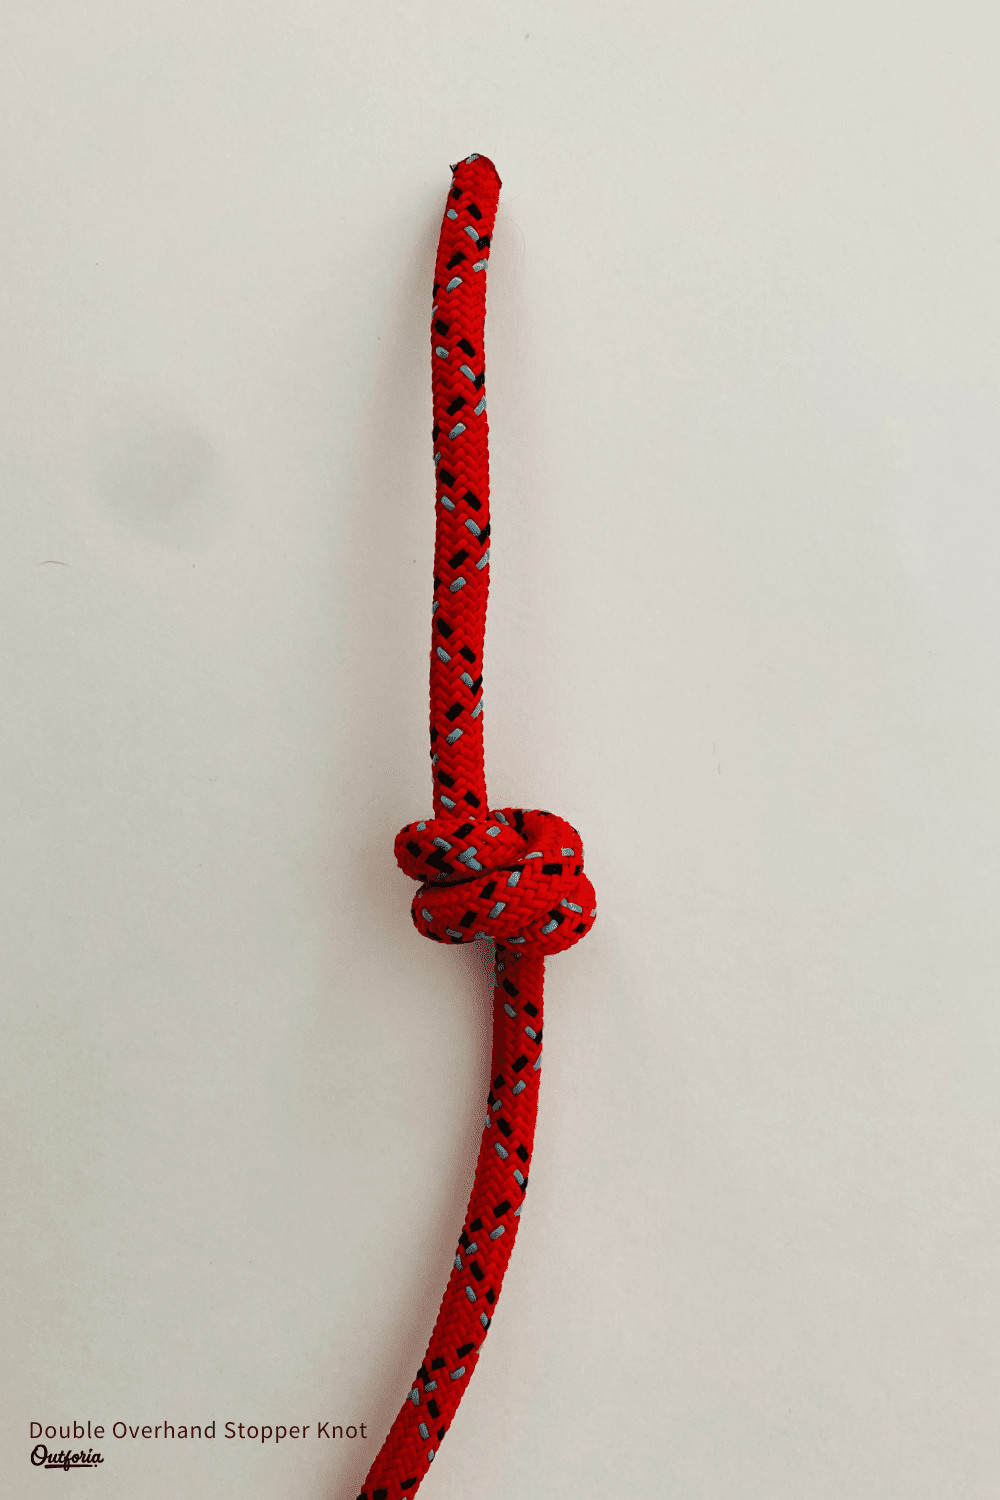
Use: Creating a secure stopper knot in the end of a rope or line. Preferable to the overhand knot due to its added bulk and reliability.
Pros:
- Simple stopper knot for most situations
- Can be combined to create a bend
- Provides more bulk than the overhand
- Reliably tightens on itself
Cons:
- Very difficult to untie after being loaded
- Not great for use with webbing
As its name suggests, the double overhand stopper knot is, well, a stopper knot. It’s actually one of the most reliable stopper knots out there because it has substantially more bulk than its relative, the overhand knot. This added bulk helps prevent the double overhand stopper knot from sliding through carabiners, grommets, and other similar objects for added security.
Additionally, the double overhand stopper knot tightens on itself. So long as you provide it with enough tail (at least 10 in/25 cm; more is better), it’s unlikely to come undone while under load. In fact, the double overhand is so reliable that it’s often used as a secondary knot for the bowline to prevent the bowline from coming undone.
The one major drawback to the double overhand stopper knot is that it is very, very difficult to untie after it’s been heavily loaded. Repeated heavy loads on one of these knots can be nearly impossible to untie, so take care when using this knot in such situations. Also note that this knot is not ideal for webbing. If you want to use webbing, the overhand knot is best.
To tie the double overhand stopper knot:
- Create a loop in a piece of rope.
- Pass the working end into the loop you made in step 1.
- Insert the working end into the same loop again.
- Pull the working and standing ends of the rope to create the double overhand stopper knot.
6. Double Fisherman’s Bend
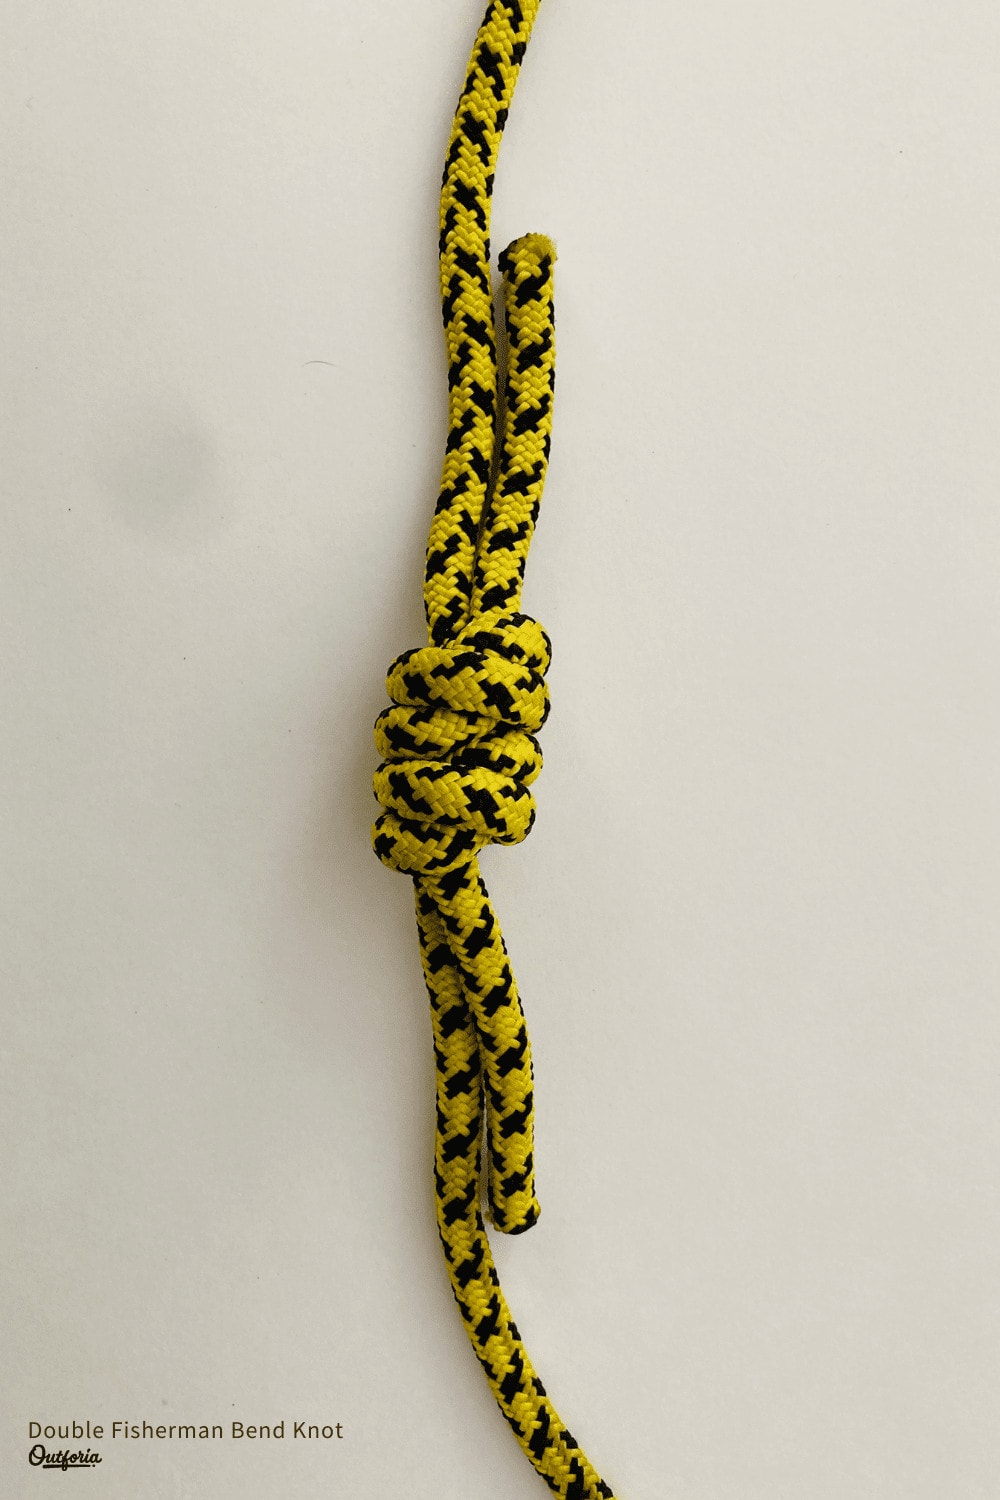
Use: Joining two ropes of similar sizes together
Pros:
- Simple way to secure two ropes for load-bearing situations
- Tightens on itself for added security
- Popular option for creating Prusik Loops for climbing
Cons:
- Very difficult to untie after being loaded
- Tails must be left very long to prevent failure
- Additional precautions needed for slippery rope fibers (Dyneema, etc.)
The double fisherman’s bend (also called the grapevine bend) is one of the most popular ways to join two ends of similar-diameter rope for load-bearing situations, like climbing.
This knot (technically a bend, more on that later) is so popular because it tightens down on itself, which helps prevent it from coming undone. Ironically, this feature of the double fisherman’s is also one of its pitfalls as this knot can be impossible to untie after it is subjected to repeated heavy loads.
It’s not necessarily obvious by looking at a photo of it, but the double fisherman’s is effectively two double overhand knots stacked on top of each other. This knot can be used in any rope. But note that you may need to create a triple or even a quadruple fisherman’s knot when working with very slippery rope fibers, such as Kevlar, Dyneema, and Spectra.
Finally, although this knot is exceptionally popular for use with Prusik Loops in climbing, precautions are needed when doing so. The tails of the double fisherman’s should be at least 4 inches (10 cm) long, but the longer the better. Tails that are too short can cause knot failure.
To tie the double fisherman’s knot:
- Hold two ends of rope—one in each hand. The strand in your right hand is Rope A. The strand in your left hand is Rope B.
- Take the working end of Rope A and create a double overhand knot around the standing end of Rope B. Be sure to leave at least 4 in (10 cm) of tail.
- Take the working end of Rope B and create a double overhand knot around the standing end of Rope A. Be sure to leave at least 4 in (10 cm) of tail.
- Pull the standing ends of each rope to create the double fisherman’s knot.
7. Bowline
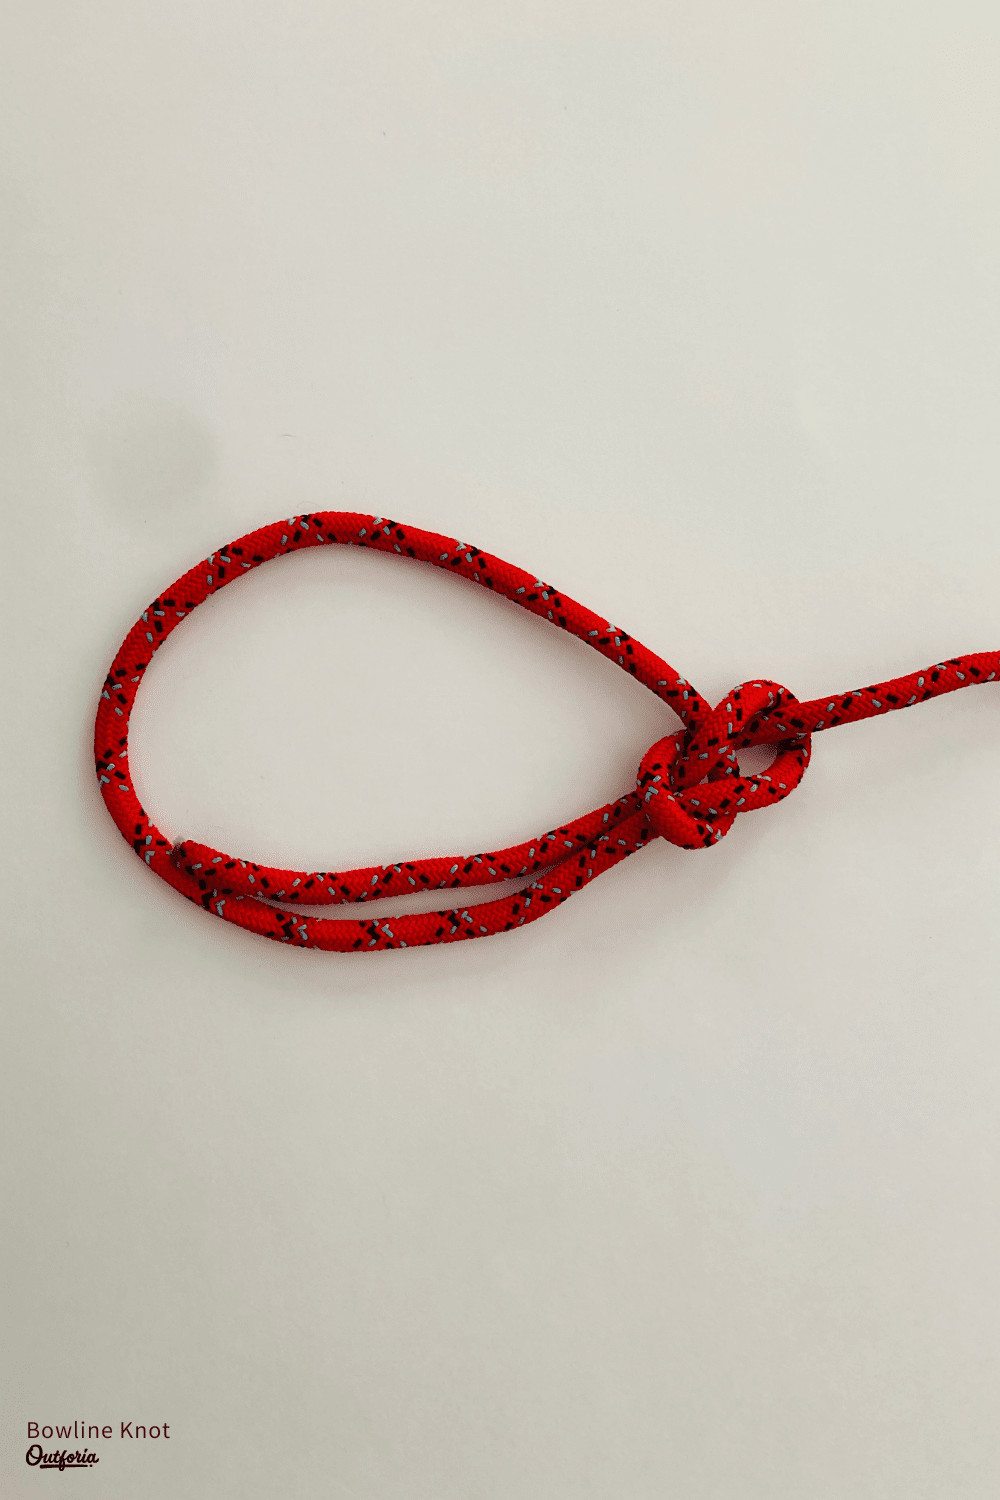
Use: Creating a loop at the end of a rope. Very popular in sailing, has some limited functionality in climbing.
Pros:
- Very easy to untie after being loaded
- Easily adjustable loop size
- Dozens of ways to tie
- Doesn’t slip or bind under load
Cons:
- Can come undone when not under load
- Easy to tie incorrectly
- Can’t be untied or adjusted under load
The bowline (pronounced BOH-lynn) is one of the most famous knots in the world. It has long been used for nautical purposes, hence the name bowline, which is an amalgamation of the words bow (meaning the fore of a vessel) and line (referring to the rope itself).
Bowlines are a popular knot for sailing purposes as they can be used to tie rope to a mooring or to any post. They also have limited functionality in rock climbing, such as when setting up toprope anchors. However, the use of the bowline for tying-in to a rock climbing rope is controversial and should only be done by experienced climbers.
The primary advantage of the bowline is that it is very easy to untie after it’s been loaded. However, it can’t be untied under load and it can even come undone if it’s not loaded. Therefore, in load-bearing situations, the bowline should always be tied with a stopper knot (preferably a double overhand) on its tail.
There are dozens of ways to tie a bowline, so we couldn’t possibly discuss them all here. Keep in mind that there are also dozens of ways to tie a bowline incorrectly so care should be taken to learn how to tie this knot properly.
To tie a bowline:
- Create a small loop in the working end of the rope, approximately 1 ft (30 cm) from the end of the rope.
- Thread the working end of the rope through the loop.
- Wrap the working end of the rope behind the standing and of the rope.
- Pass the working end of the rope through the loop you made in step 2.
- Tie a double overhand in the working end of the rope. The double overhand should wrap around the principal loop of the bowline.
- Pull the working and standing ends of the rope to create the bowline.
8. Water Knot
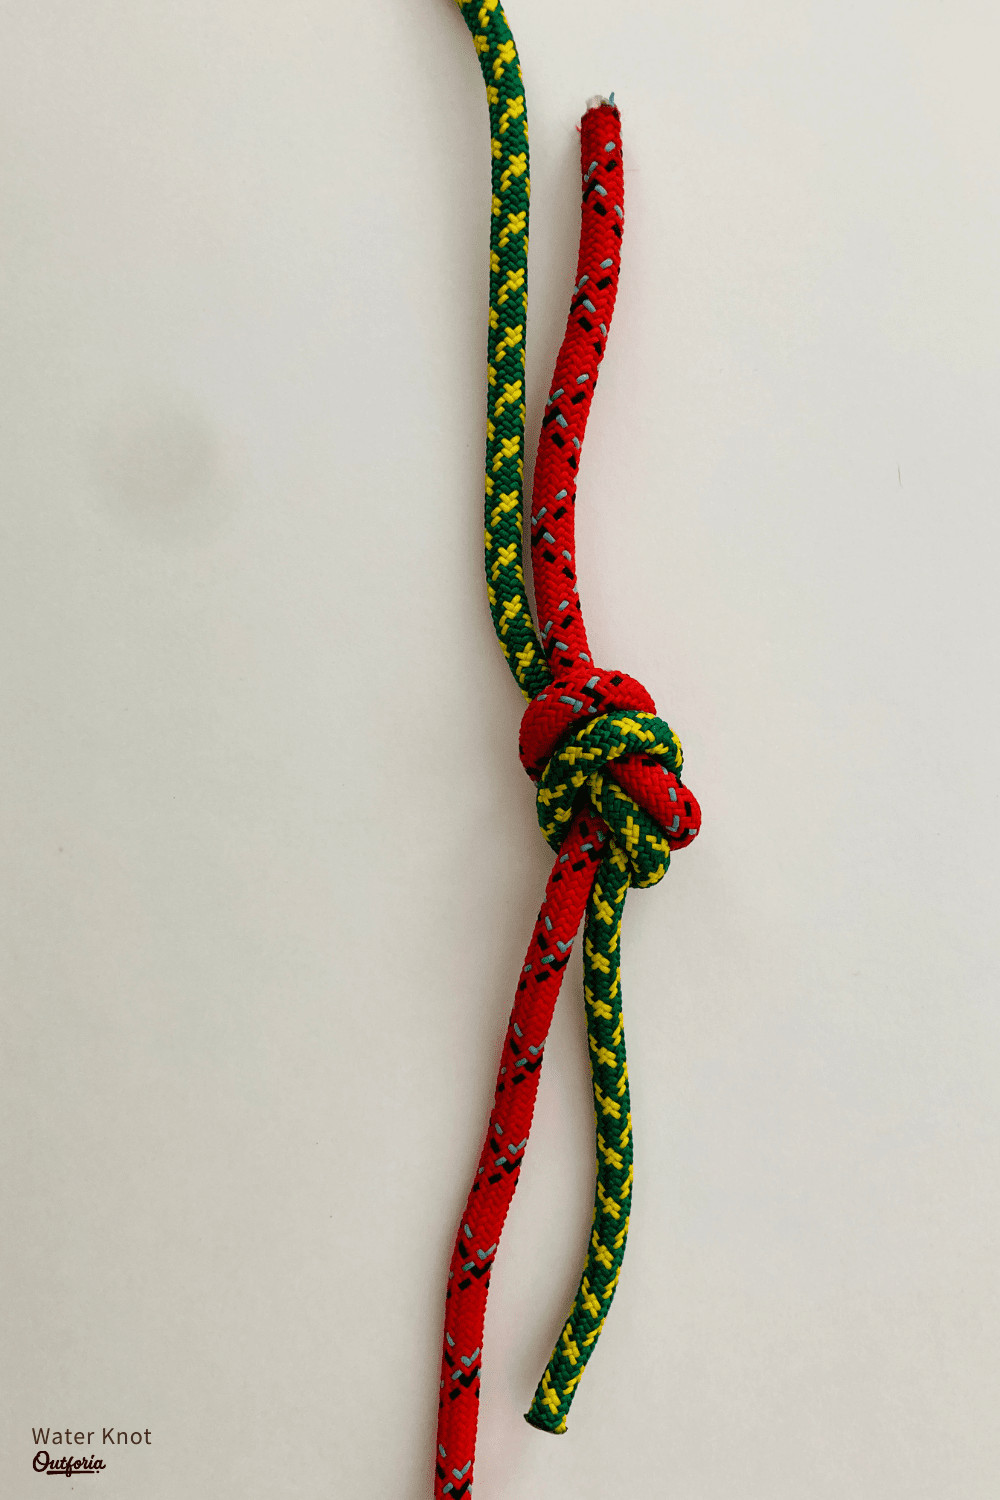
Use: Joining two pieces of webbing or rope together. The ideal knot for combining two pieces of webbing.
Pros:
- Easy to tie
- Perfect for use in webbing
- Requires minimal rope to tie
Cons:
- Very difficult to untie after being loaded
- Requires very long tails
Also called the ring bend, the water knot (actually a bend) is one of the knots in the overhand series. In fact, the water knot is effectively a version of the overhand knot, but with a few extra steps.
The main advantage of the water knot is that it is the ideal choice for joining two ends of webbing. It creates a relatively low-profile knot that’s less likely to get snagged on rocks when made with webbing.
Note that this knot requires a large amount of tail (1 ft/30 cm is a good minimum). That’s because the tails of this knot are known to slide through the knot itself after repeated loads. Frequent inspection of the water knot is required for use in load-bearing situations.
One of the best ways to describe the water knot is as an overhand follow-through. In fact, you tie this knot by creating an overhand knot in one end of webbing and then using the other end of webbing to re-trace that initial knot’s path.
To tie a water knot:
- Hold two ends of rope or webbing—one in each hand. The strand in your right hand is Rope A. The strand in your left hand is Rope B.
- Tie an overhand knot in Rope A. Do not tighten the knot.
- Take the working end of Rope B and thread it through the overhand knot in Rope A.
- Use the working end of Rope B to re-trace the path of the overhand knot in Rope B, following the exact path of the knot.
- Pull on the working and standing ends of both ropes to create the water knot.
9. Prusik Hitch
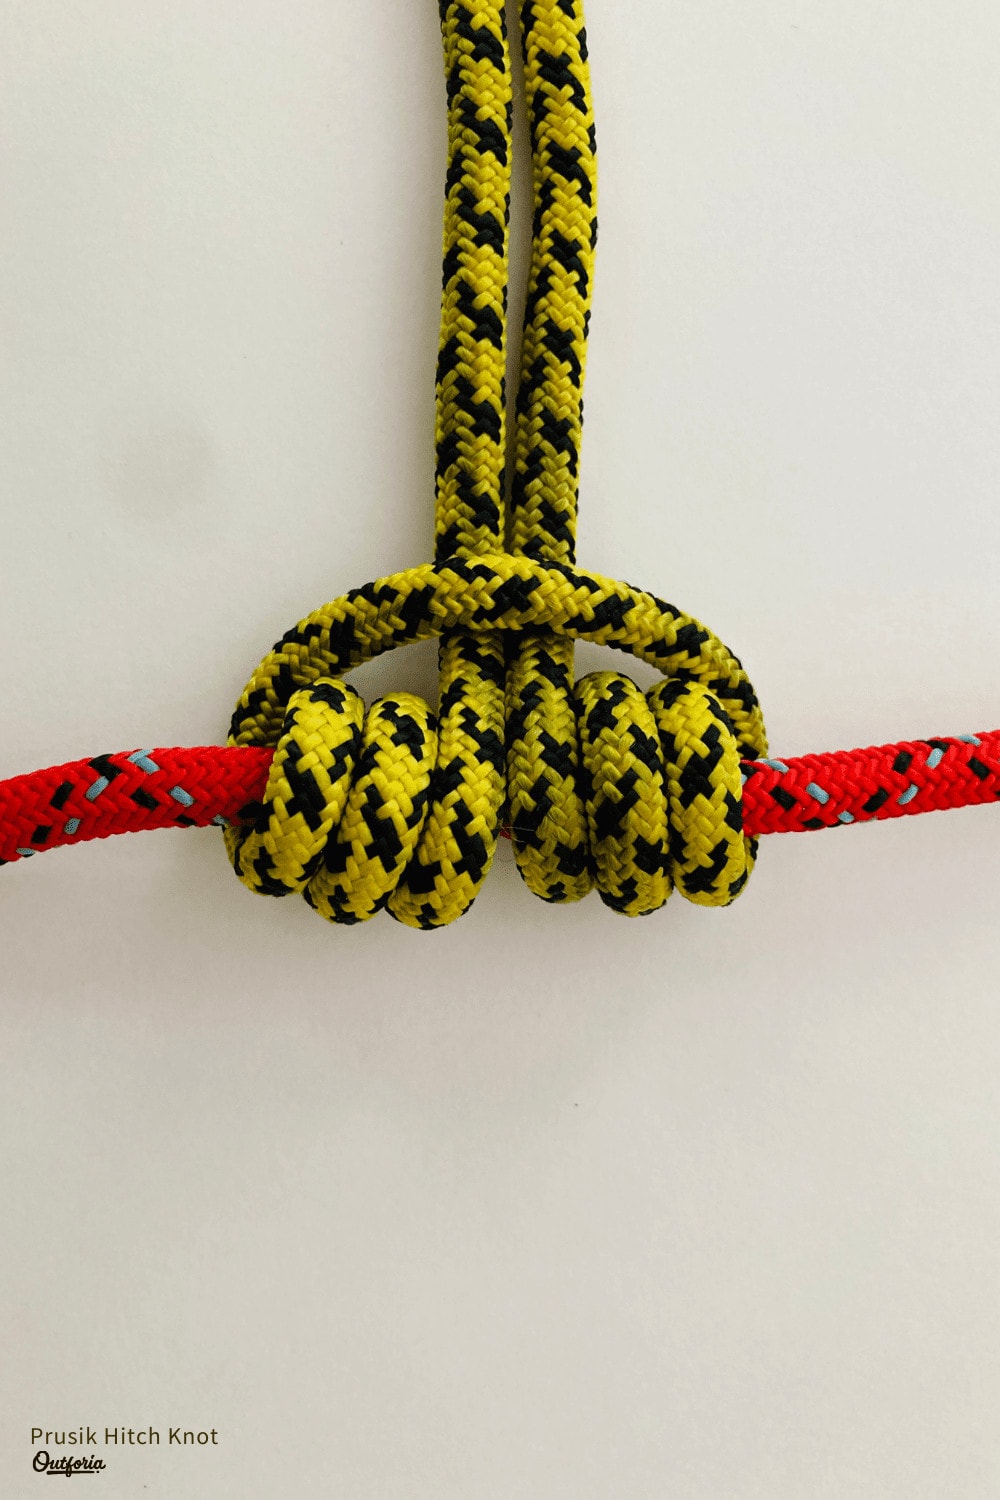
Use: Creating friction around ore or more strands of rope using a piece of cord. Traditionally used for ascending a rope. Now used mostly to add friction to a rope system.
Pros:
- Can be loaded bidirectionally
- Relatively easy to inspect for proper technique
- Provides excellent friction
Cons:
- Difficult to release under load
- Not great for use with webbing
Named after German doctor Karl Prusik, who first promoted its use in the 1930s, the Prusik hitch is a popular friction hitch among climbers. It was traditionally used for ascending lines of rope, however, its use in rope ascension has since been replaced by advanced ascending devices.
Nowadays, the Prusik is fairly popular as a back-up friction hitch for rappelling. It can also be used to apply friction to a rope system, such as for creating a one-way pulley.
One big advantage of the Prusik over other friction hitches is that it can be loaded from the top or bottom. Many other friction hitches can only be loaded from one direction. But, the Prusik is nearly impossible to release when under heavy load.
If you want to tie a Prusik, you will need a piece of cord (tied in a sling) to tie the hitch and another rope to tie the hitch around. There should be a sizable diameter difference between these two lines, with the cord being at least 3 mm thinner than the other rope. Also note that webbing is not suitable for tying a Prusik.
To tie a Prusik:
- Hold a bight of the sling cord in one hand.
- Pass the bight around the rope.
- Feed the bight of cord through the inside of the sling.
- Repeat steps 2 and 3 a total of 3 times. You can add more loops for additional friction, if needed.
- Pull the bight to tighten the Prusik hitch. Yank the bight in either direction to test the friction capabilities of the knot. If the Prusik does not provide enough friction, add additional loops to the hitch.
10. Kleimheist
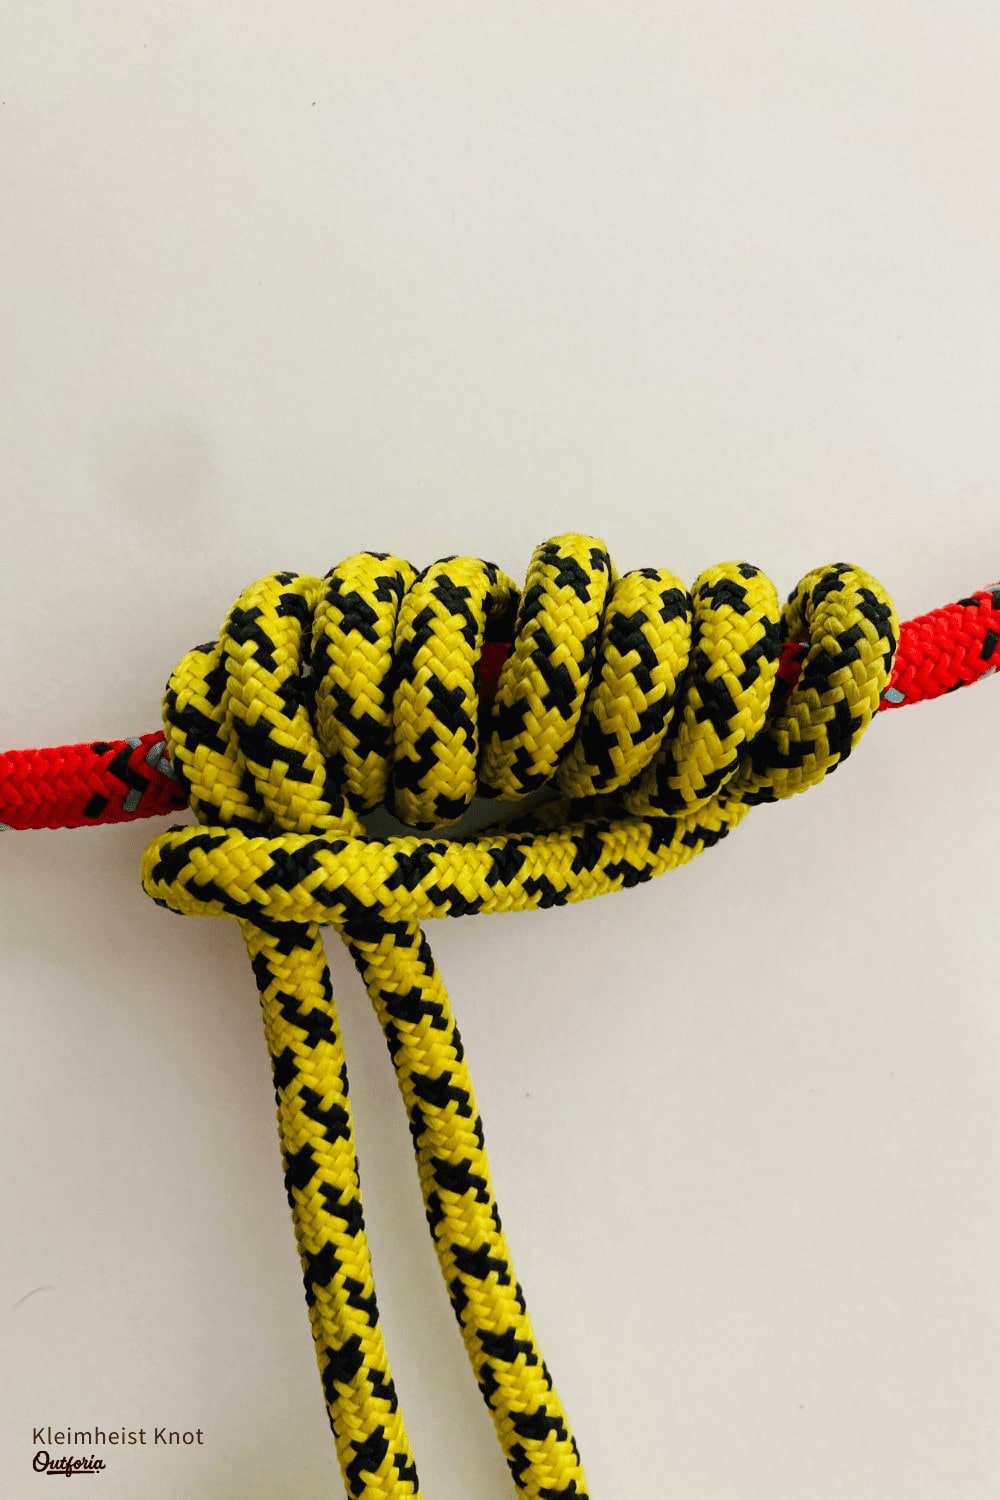
Use: Creating friction around a rope. Ideal for use with webbing. Can also be used with cord.
Pros:
- Easy to loosen under load
- Can be tied with webbing
- Provides excellent friction
Cons:
- Can only be loaded in one direction
In many ways, the Kleimheist is similar to the Prusik knot. Like the Prusik, the Kleimheist is a friction hitch, which means that it can provide friction on a rope for rope ascension and for the creation of one-way pulleys.
The main difference between a Kleimheist and a prusik is that a Kleimheist is unidirectional. This means that you can only load a Kleimheist from one direction. If you load the Kleimheist from the wrong direction, it will not provide the same level of friction. Plus, the Kleimheist, unlike the Prusik, can be released under load.
Additionally, the Kleimheist is regarded as one of the best friction hitches for use with webbing. While it is also effective when used with cord, the Kleimheist is second to none when making a webbing-based friction hitch.
If you want to tie a Kleimheist, you will need a piece of cord or webbing (tied in a sling) to tie the hitch and another rope to tie the hitch around. There should be a sizable diameter difference between these two lines if you’re using cord, with the cord being at least 3 mm thinner than the other rope.
To tie a Kleimheist:
- Hold a bight of the sling in one hand.
- Pass the bight around the back of the rope.
- Wrap the sling around the rope at least 3 times moving up the rope.
- Pass the other end of the sling upward through the bight.
- Pull down on the sling in the direction of the expected load (in this case, downward) to create the Kleimheist. If the Kleimheist does not provide enough friction, wrap the sling around the rope 2 to 3 more times.
11. Alpine Butterfly
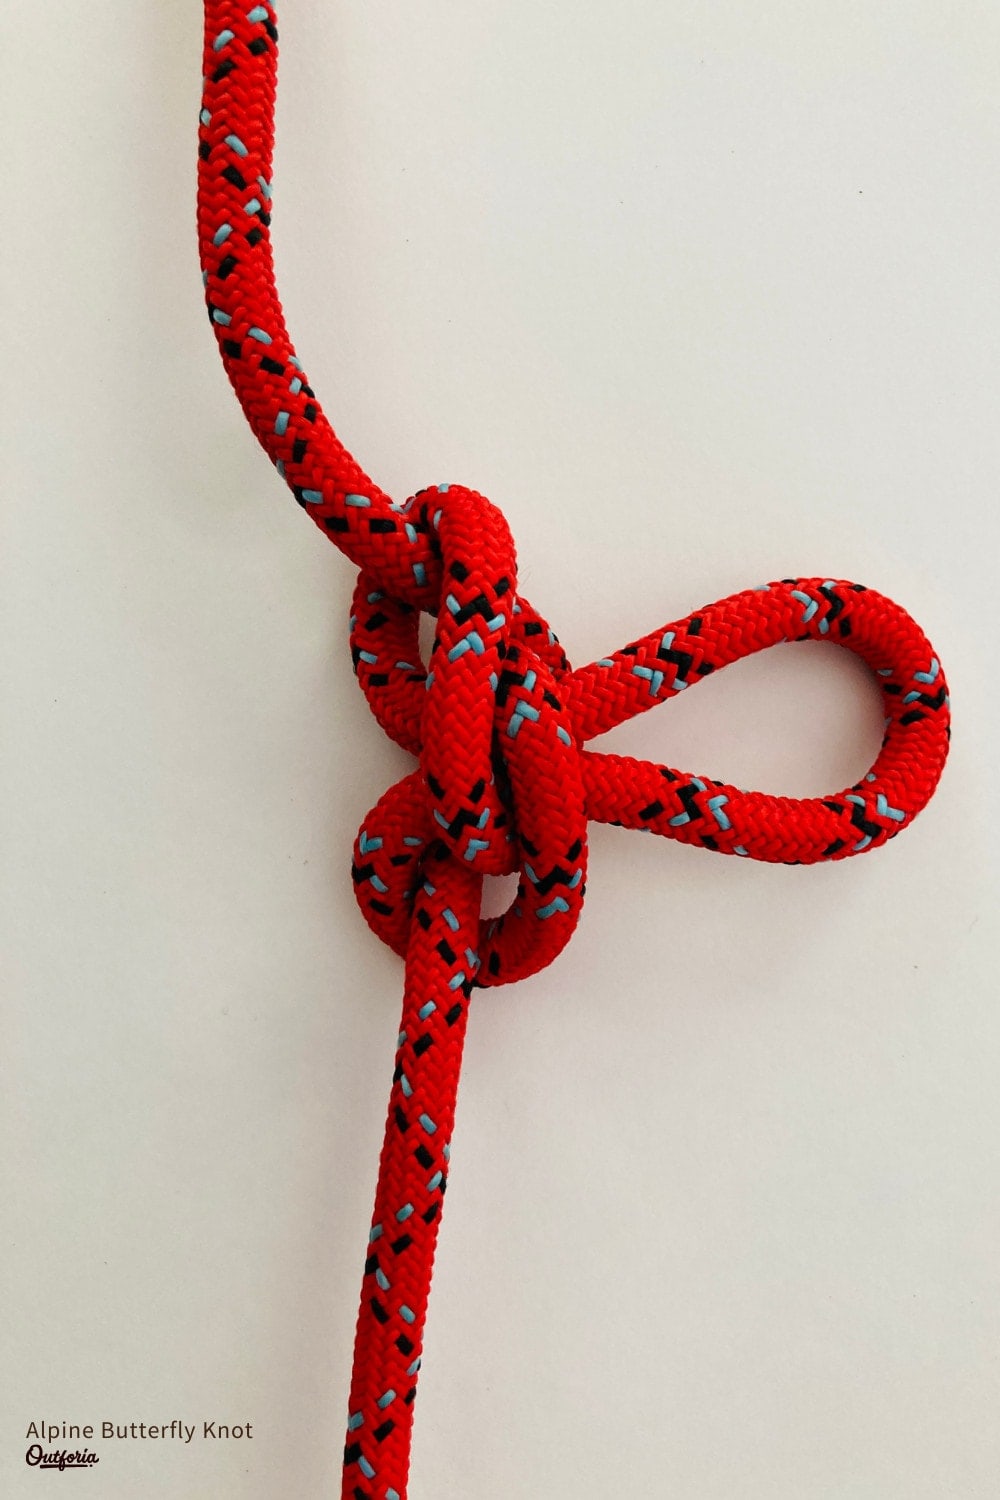
Use: Creating a loop in the middle of a length of rope. Popular for tying-in a climber to the middle of a rope.
Pros:
- Allows you to create a loop in the middle of a rope
- Can be loaded from 3 directions
- Many ways to tie
- Does not roll-over under heavy load
- Relatively easy to untie after being loaded
Cons:
- Somewhat complex to tie
The alpine butterfly is one of the most useful, yet underrated knots on our list. Although there are a number of other knots out there that are easier to tie and that can do many of the jobs of the alpine butterfly, they are simply not as good in most situations.
While this knot can be used for many purposes, its primary purpose is to create a loop in the middle of a length of rope. This loop can then be used to tie into if you’re climbing or to isolate a damaged section of the rope.
Unlike most other alternatives, the alpine butterfly can be loaded from three directions: from either end and from the loop itself. Plus, the alpine butterfly can be subjected to heavy loads—all without rolling over and failing.
Keep in mind that this knot can be complex to tie. It also doesn’t help that there are dozens of ways to tie this knot. We will discuss one way here, but if you struggle with it, know that you have other methods to choose from.
We will also describe our chosen method as if you were tying the knot with your right hand. You can also use this method if you are left-handed, but you will need to adjust our directions accordingly.
To tie an alpine butterfly:
- Grasp the working end of the rope in your right hand. Note that the working end is simply a section of the middle of your chosen rope.
- Hold your left hand out in front of you with your palm facing upward.
- Wrap the working end of the rope around your fingers twice, starting from the right side of your hand and moving to the left. The working end of the rope should end up on the left side of your left hand. It should create a cross on your palm with the standing end of the rope.
- Grab the top of the two loops that you created around your left hand.
- Pull this loop down toward your palm.
- Pass the loop up behind the crossing strands on your palm. The loop should now point upward toward your fingers.
- Pull the loop upward to tighten the knot and create an alpine butterfly.
12. Sheet Bend
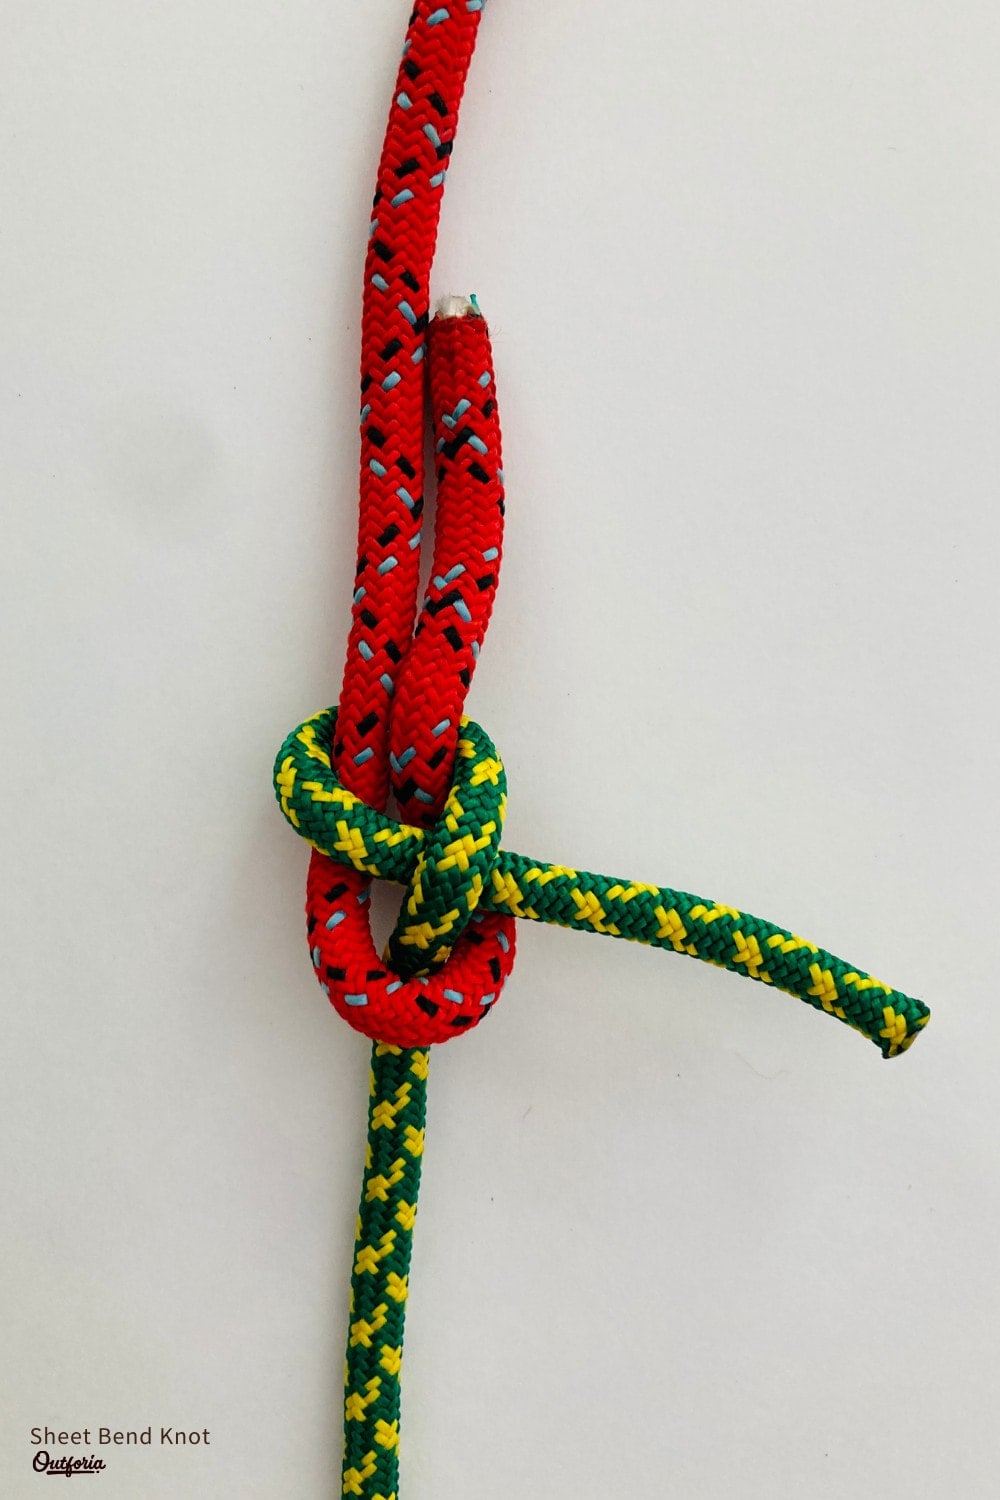
Use: Joining two ropes of unequal size. Relatively popular in sailing. Useful, though less common, in many other outdoor pursuits.
Pros:
- Can securely join ropes of different sizes
- Useful for creating a cargo net
Cons:
- Can’t be tied under load
Also known as the weaver’s knot, the sheet bend is one of the best ways to join together two ropes of unequal size. Although it can also be used to join ropes of equal size, it is unparalleled in its ability to effectively join two different-sized ropes.
The sheet bend can handle fairly heavy loads; however, care should be taken to provide very long tails if the sheet bend is going to be used in load-bearing situations. Do note that this knot can’t be tied if either or both ropes are under tension.
If you choose to tie a sheet bend, keep in mind that you may need to use the double sheet bend if there is a very large size difference between your two ropes. The double sheet bend is tied exactly like the regular sheet bend, but with a second loop around the larger rope.
To tie a sheet bend:
- Create a bight in the thicker of your two ropes.
- Pass the working end of the thinner rope through the bight you made in step 1.
- Wrap the working end of the thinner rope around the backside of the standing end of the thicker rope.
- Pass the working end of the thinner rope under itself.
- Repeat steps 3 and 4 if creating a double sheet bend.
- Tighten all strands to create the sheet bend.
13. European Death Knot
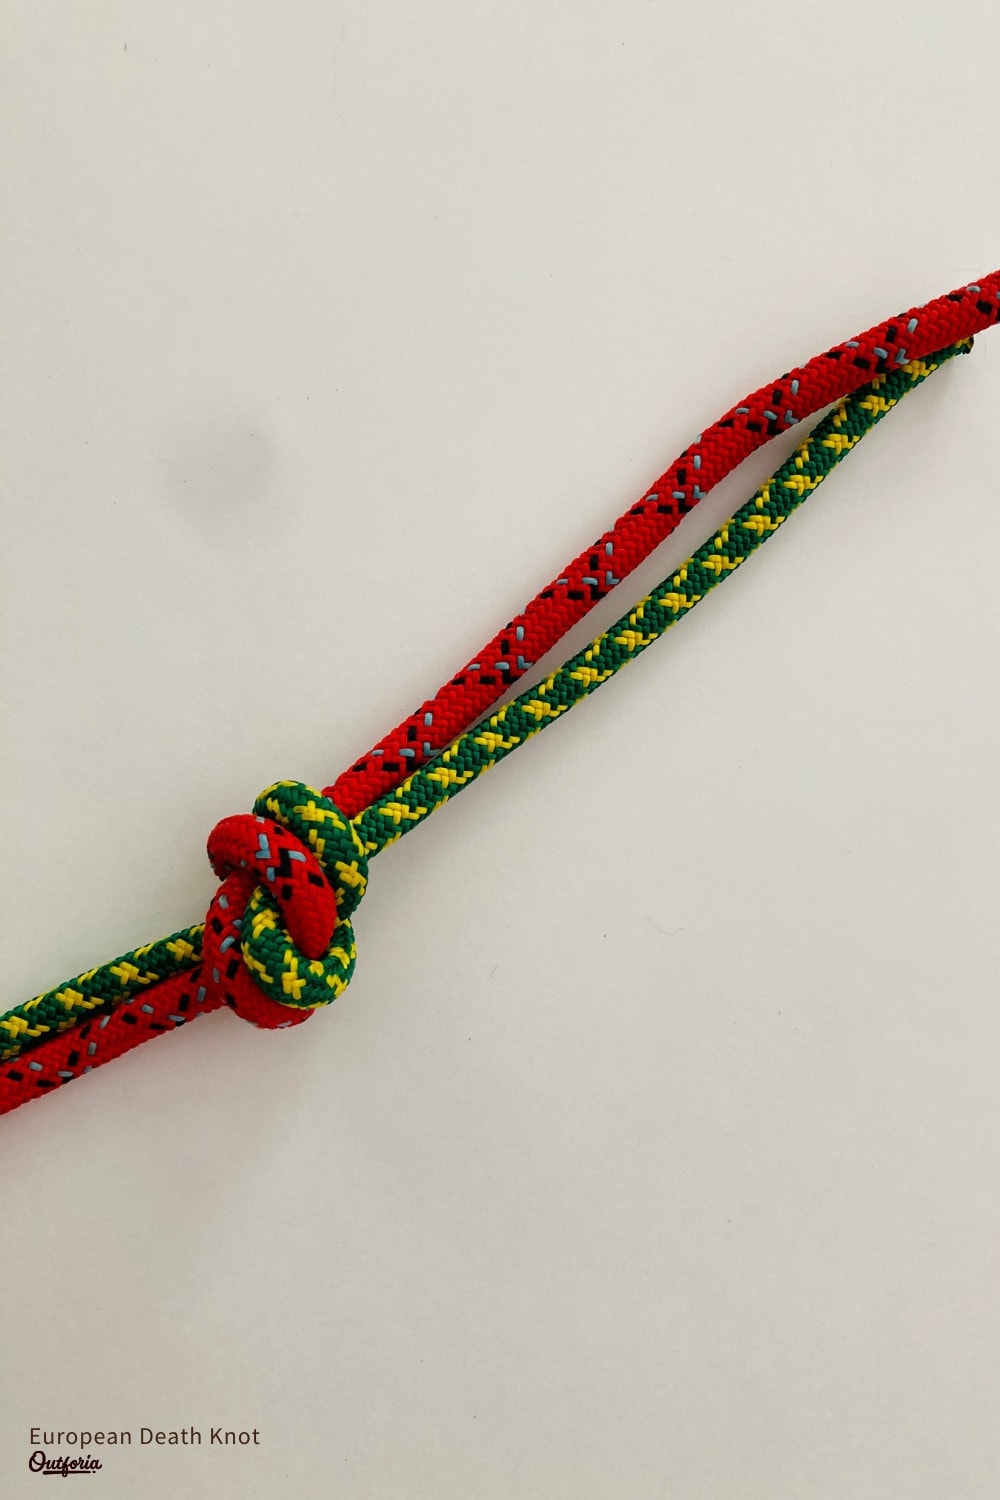
Use: Joining two ropes of the same diameter together. Popularly used for rappelling off of two ropes.
Pros:
- Easy to tie
- Relatively easy to untie
- Low profile construction infrequently gets stuck
Cons:
- Must be dressed neatly
- Requires a lot of tail
Despite its scary-sounding name, the European death knot is not inherently a dangerous knot. Also called the flat overhand, the European death knot got its scary nickname from the fact that it has been implicated in a number of climbing accidents, particularly in Europe. However, with proper knot-tying technique, there is nothing inherently dangerous about this knot.
The European death knot is designed to attach two ropes of equal diameter for rappelling or other similar purposes. It can be used for ropes of different diameters, but this is not recommended.
The key with this knot is that it needs a lot of tail—and we mean a lot. Think at least 2 feet (60 cm) of tail.
If that sounds like an excessive amount of tail, it’s because this knot is prone to rolling over itself when put under very, very heavy loads. To prevent this knot from rolling over itself and coming undone, a large amount of extra tail is warranted when used in load-bearing situations.
Also, please note that there is a similar, but very different knot called the flat figure eight that should never be used for load-bearing situations. The flat figure eight is tied just like the flat overhand but with an additional loop to create a figure eight shape. This dangerous knot rolls under very low loads and is not suitable for climbing or other similar situations.
To tie the European death knot:
- Hold both ends of rope together in one hand.
- Tie a single overhand knot using both ropes.
- Ensure that there is at least 2 feet (60 cm) of tail between the knot and the ends of each rope.
- Tighten all strands to create the European death knot.
14. Munter Hitch
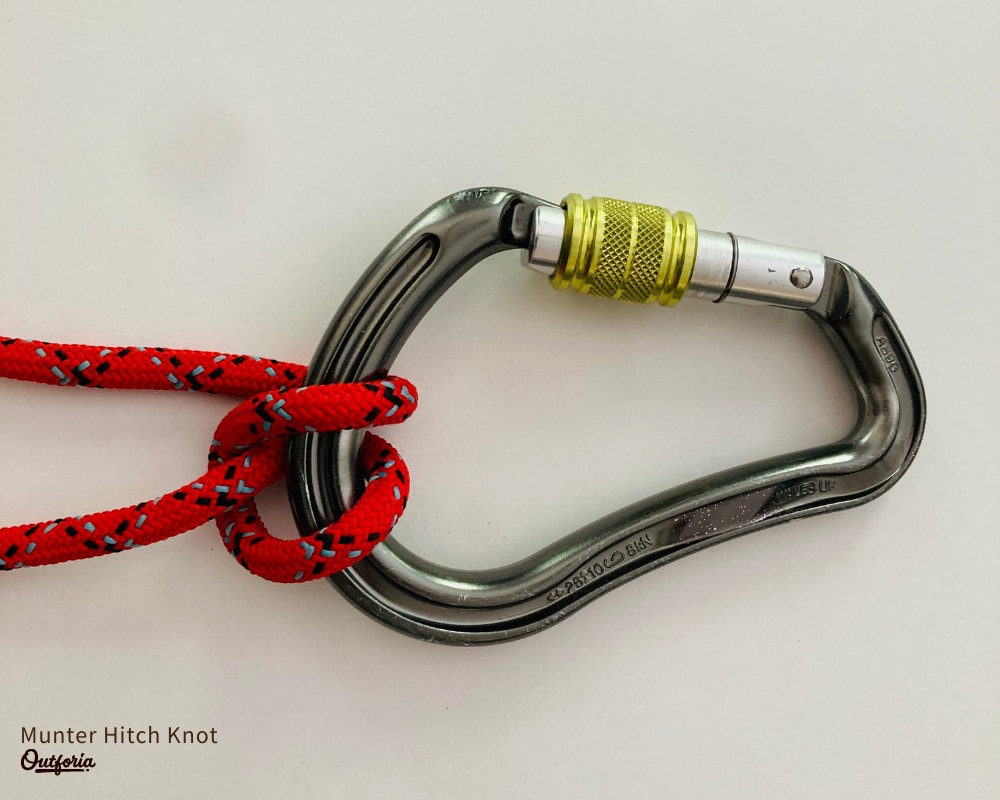
Use: Tensioning ropes that need to be adjustable. Traditionally used to belaying or rappelling during climbing, though it is now more common in rope rescue systems.
Pros:
- Fully adjustable hitch
- Can be locked off with a mule knot
- Does not jam
- Can be used for emergency rappels
Cons:
- Requires constant rope management
- Adds twists to the rope
Frequently called the Italian hitch, the Munter hitch is a time-honored classic in the rock climbing and arborist communities. The Munter hitch’s primary claim to fame is that it is a fully adjustable, non-jamming hitch that can be used in load-bearing situations.
After it was first developed in the 1950s, the Munter hitch became a popular choice among climbers. That’s because it offered a straightforward way to belay and rappel before the advent of modern belay devices.
The Munter can also be used in various rope systems, including to create pulleys or to lower an injured climber. However, it needs to be used with caution in load-bearing situations as additional knots or friction devices are necessary to prevent the Munter from adjusting on its own.
Finally, keep in mind that the Munter hitch introduces some fairly annoying twists into your rope. The super Munter version of this hitch is a popular alternative if you need to lower a heavy load or if you want to avoid adding kinks to your rope.
To create the Munter hitch in the center of a rope around a carabiner:
- Grab a bight of rope.
- Clip the bight of rope into the carabiner.
- Grasp a section of the rope and twist it into a loop.
- Clip the loop from Step 3 into the carabiner to create a Munter hitch.
15. Carrick Bend
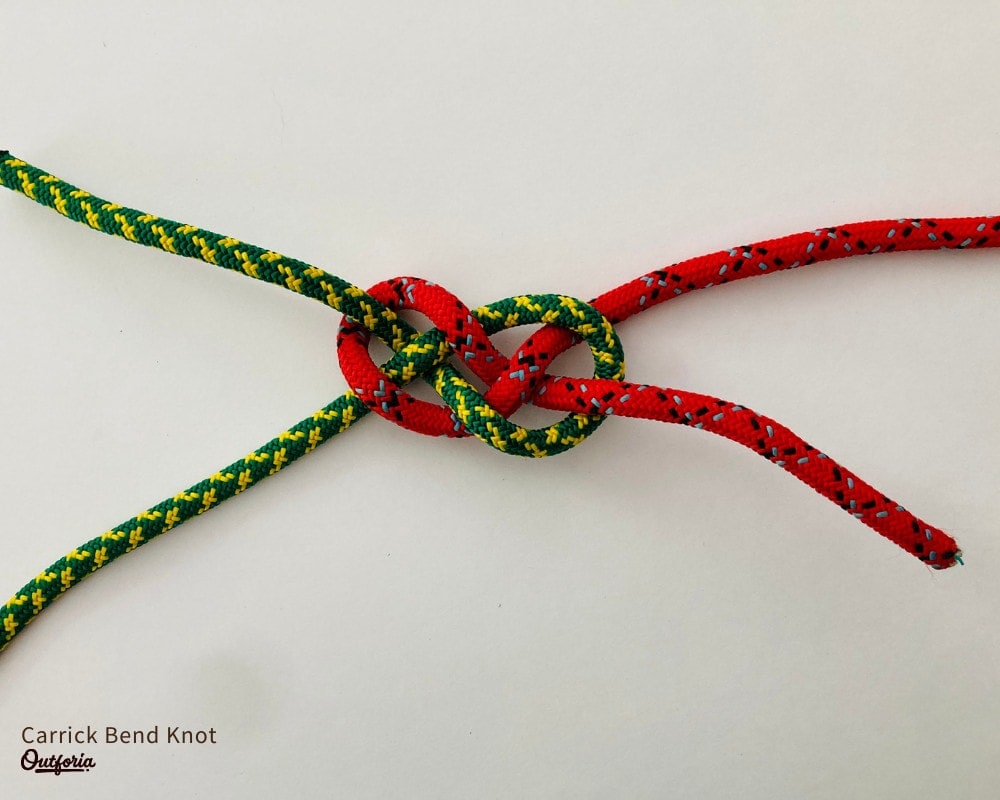
Use: Joining two ends of a rope together that need to be untied after heavy loading. Popular in sailing and as a basis for many decorative knots.
Pros:
- Securely joins two ropes together
- Can be easily untied after heavy loading
- Decorative design
- Can also be used to create a cargo net
Cons:
- Can be awkward to tie
- Dangerous if not tied perfectly
One of the world’s most classic knots, the Carrick bend is believed to have originated in the British Isles where it had long been used on heraldic badges. It has also traditionally been used to make cargo nets. These days, the Carrick bend isn’t as popular as it probably should be, but that’s mostly because it’s more difficult to tie correctly than some of the other options on our list.
The Carrick bend’s advantage over other bends is that it can be easily untied after being subjected to heavy loads. However, note that the tails of this knot need to be very long (think at least 1 ft/30 cm) for critical load-bearing purposes.
When tying the Carrick bend, note that the tails of each rope must be diagonal from one another. If not, the bend could come undone under a heavy load.
To tie a Carrick bend:
- Hold two ends of rope—one in each hand. The strand in your right hand is Rope A. The strand in your left hand is Rope B.
- Form a loop with Rope A. Ensure that the tail is under the standing end of the rope.
- Place the working end of Rope B underneath the loop you created in step 2.
- Pass the working end of Rope B over the standing end of Rope A and under the tail of Rope A.
- Thread the working end of Rope B through the loop in Rope A that you created in step 2.
- Pass the working end of Rope A under its own standing end.
- Pull the tails and standing ends of both ropes to tighten and form the Carrick bend.
16. Girth Hitch
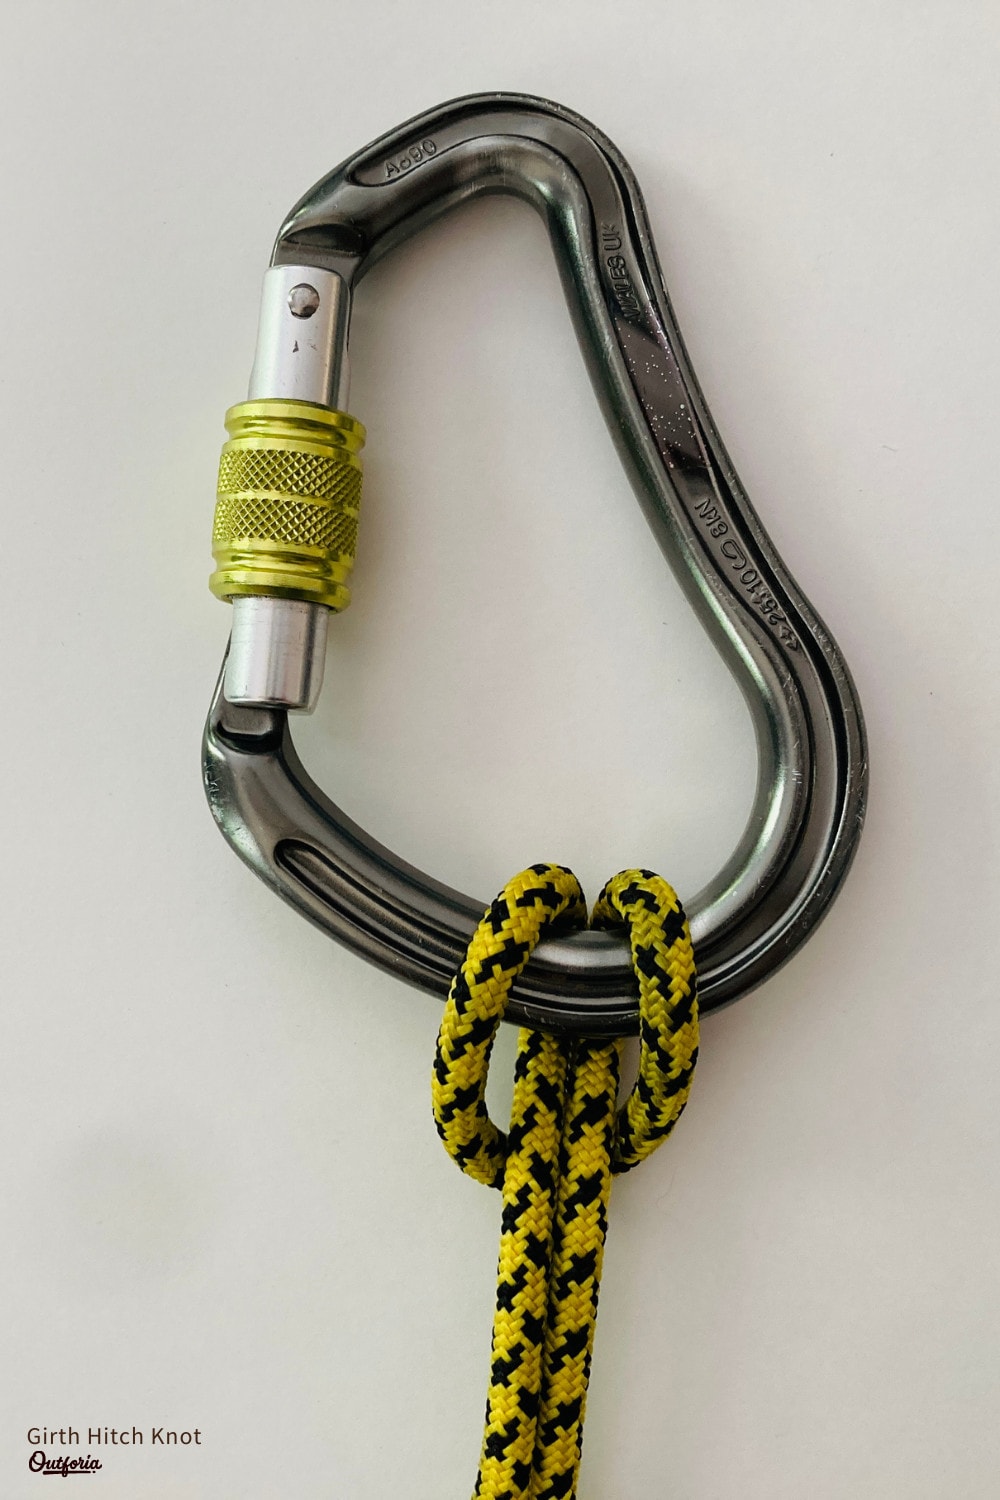
Use: Attaching rope or webbing to another object. Commonly used in climbing, hammock set-ups, and other similar situations.
Pros:
- Very easy to tie
- Can be created with webbing
- Easy to untie
Cons:
- Greatly reduces the breaking strength of rope
- Requires equal tension to be applied to both rope strands
One of the oldest-known knots, the girth hitch or “cow’s hitch” is an ancient hitch that can be used in a wide range of situations. The girth hitch is popularly used to attach ropes or webbing to another object, so it has since become very popular in climbing and camping.
The girth hitch is one of the easiest knots to tie and it is used in nearly all aspects of our lives, such as for attaching the strings of zipper pulls to the zipper itself. In fact, you’ve probably created countless girth hitches in your life, even if you didn’t know what it was called.
Girth hitches are popular because they are easy to tie and because they can be made with rope or webbing. They are also easy to untie, even after they’ve been loaded. But note that the girth hitch substantially reduces the breaking strength of rope. It also can only be used when tension will be equally applied to both rope strands. Otherwise, it could fail.
To create the girth hitch with a sling around another rope:
- Create a bight in the sling.
- Pass the bight of the sling around the back of the rope.
- Thread the other end of the sling through the bight you created in step 1.
- Pull down on the sling to tighten the line and create a girth hitch.
17. Figure Eight on a Bight
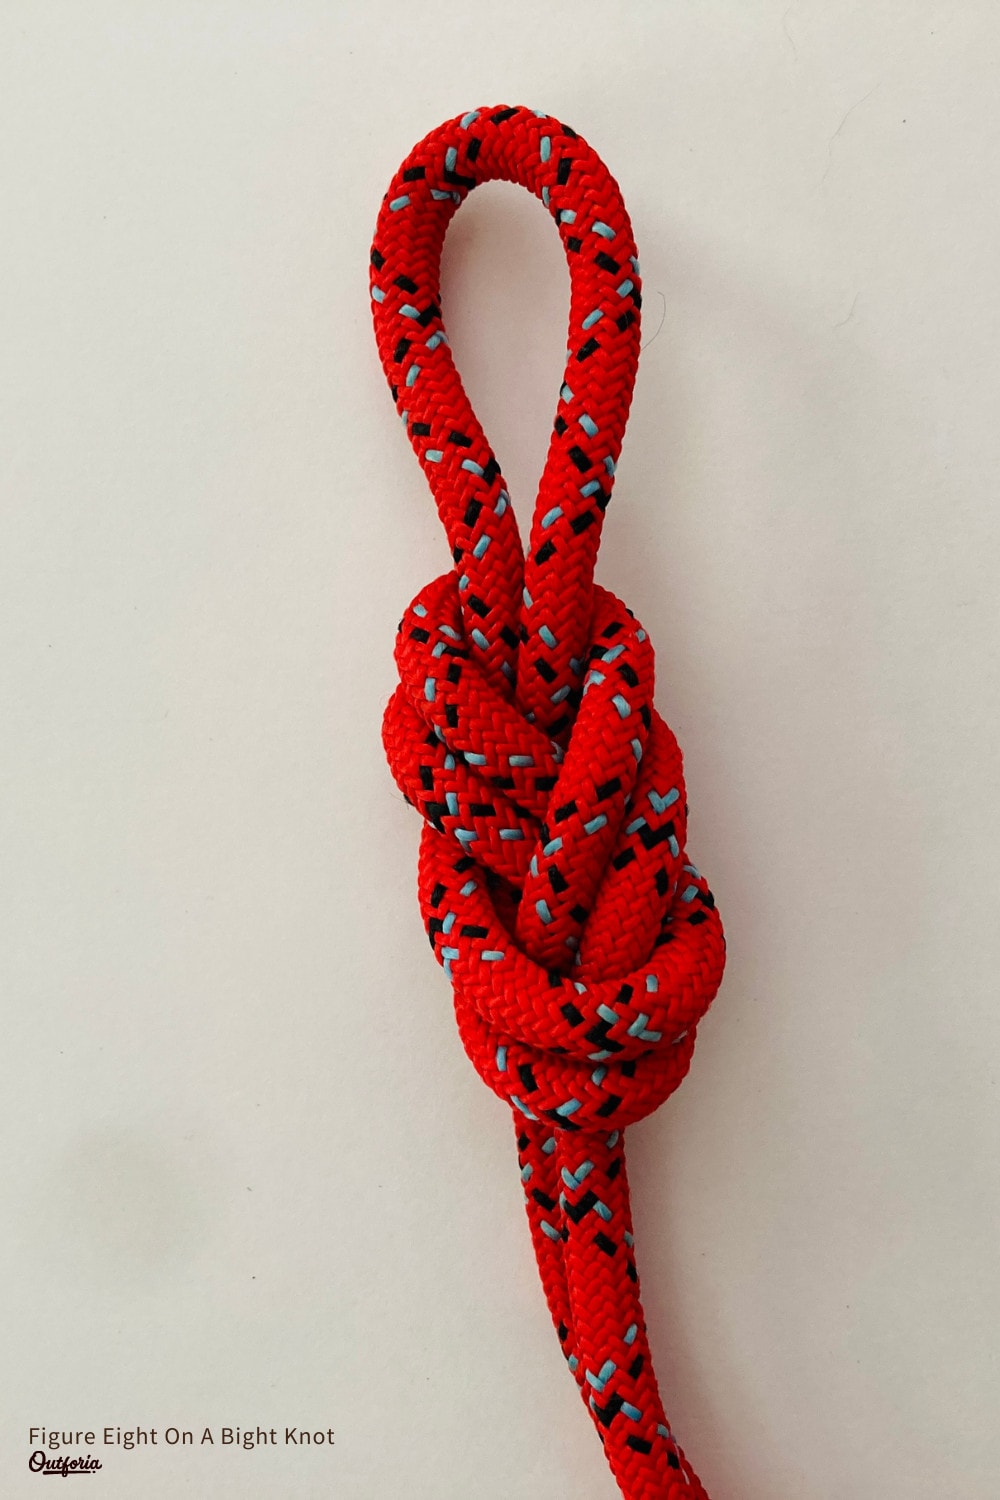
Use: Creating a secure bight of rope. Very popular in rock climbing, sailing, camping, caving, and any other load-bearing situation.
Pros:
- Tightens on itself
- Can create a loop of any size
- Easier to untie than overhand on a bight
Cons:
- Requires a large amount of tail
- Tends to bind under heavy loads
- Not great for use in webbing
Also known as the Flemish loop, the figure eight on a bight is a variation of the original figure eight knot. It is exceptionally popular for use in a variety of outdoor pursuits, though its use in climbing and sailing is perhaps most notable.
When compared to other methods of creating a bight in a rope, such as the bowline, the figure eight on a bight is arguably more secure. This is because the knot tightens on itself and is unlikely to come undone if created with an appropriate amount of tail.
Most people find that the figure eight on a bight is easier to untie than the overhand on a bight after being loaded. However, it is still more difficult to untie than the bowline after being loaded because it is a jamming knot. Also keep in mind that this knot is not ideal for use in webbing. If using webbing, create an overhand on a bight instead.
To tie a figure eight on a bight:
- Grab a bight of rope, being sure to leave at least 1 ft (30cm) of space between your hand and the end of the bight.
- Use the bight to create a figure eight shape, just like you would do with a regular figure eight knot.
- Pull all strands of the rope to tighten and to create the figure eight on a bight.
18. Half Hitch
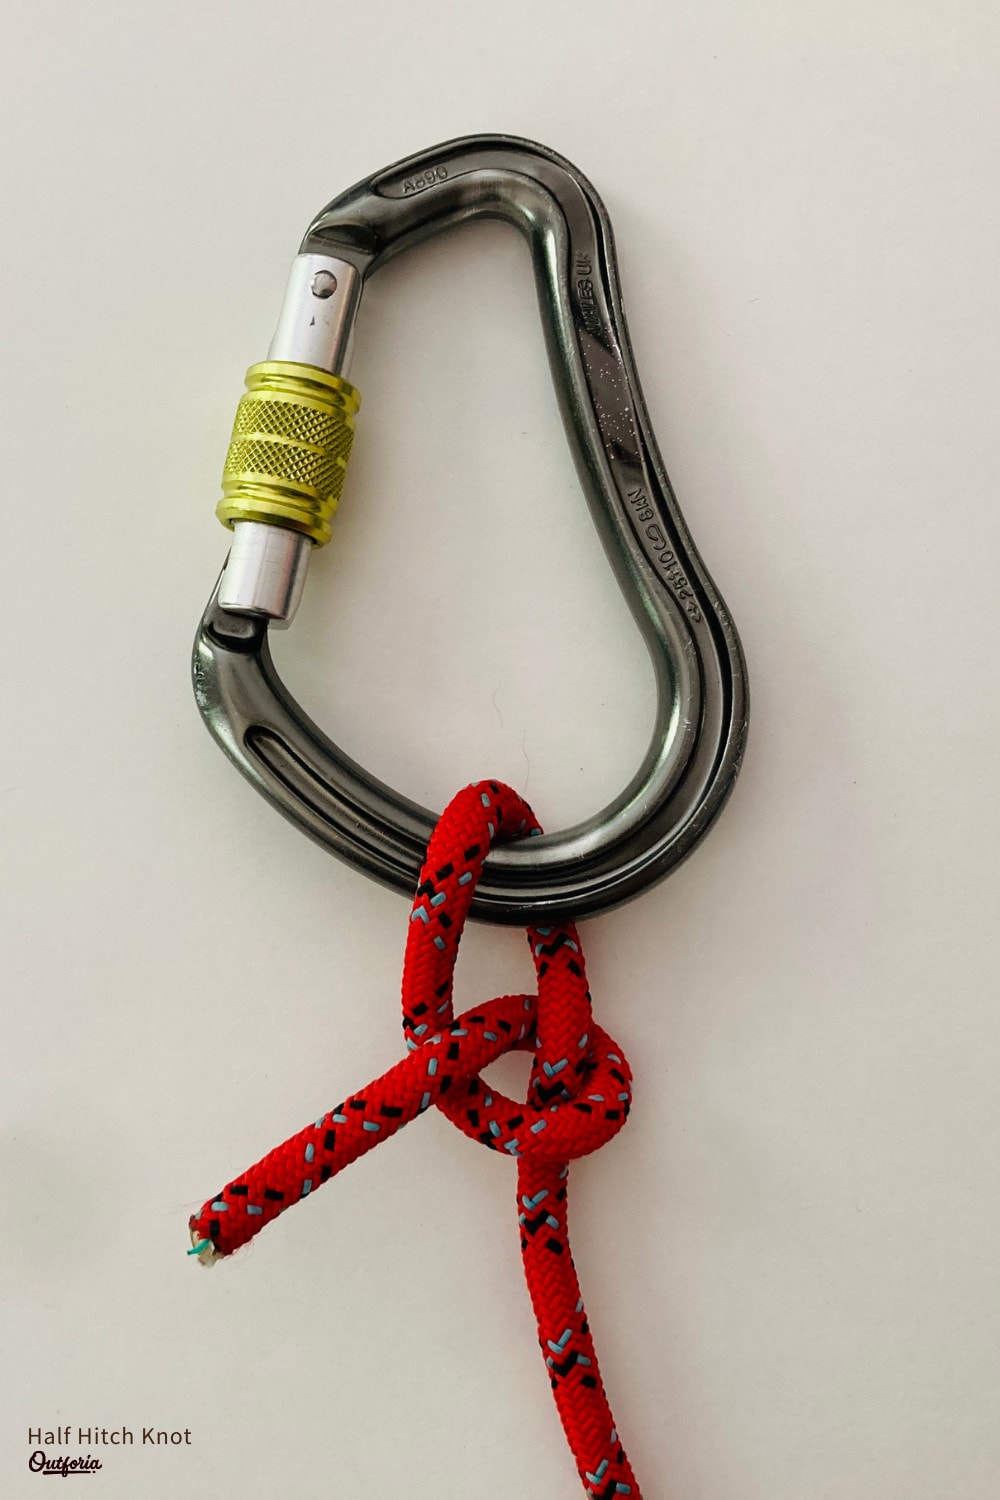
Use: Loosely securing a rope to another object. Forms the basis of many other hitches, knots, and bends.
Pros:
- Easy to tie
- Useful skill for other hitches
- Easily untied after loading
Cons:
- Not weight bearing on its own
An essential skill for any knot tying enthusiast, the half hitch is an ancient hitch that forms the basis of a wide range of other hitches, knots, and bends. It is straightforward and easy to tie and it is a non-jamming hitch that’s easy to untie after being loaded.
The problem with the half hitch is that it should not be tied on its own in load-bearing situations. In such a situation, the half hitch should be used with another knot or with a second half hitch (called two half hitches). Creating two half hitches together actually forms a clove hitch.
To create a half hitch around an object, such as a pole:
- Wrap the rope around the pole or another object.
- Cross the working end of the rope around the standing end to create a loop.
- Pass the working end of the rope through the loop you made in step 2.
- Pull on the standing end of the rope to tighten and create the half hitch.
19. Orvis Knot
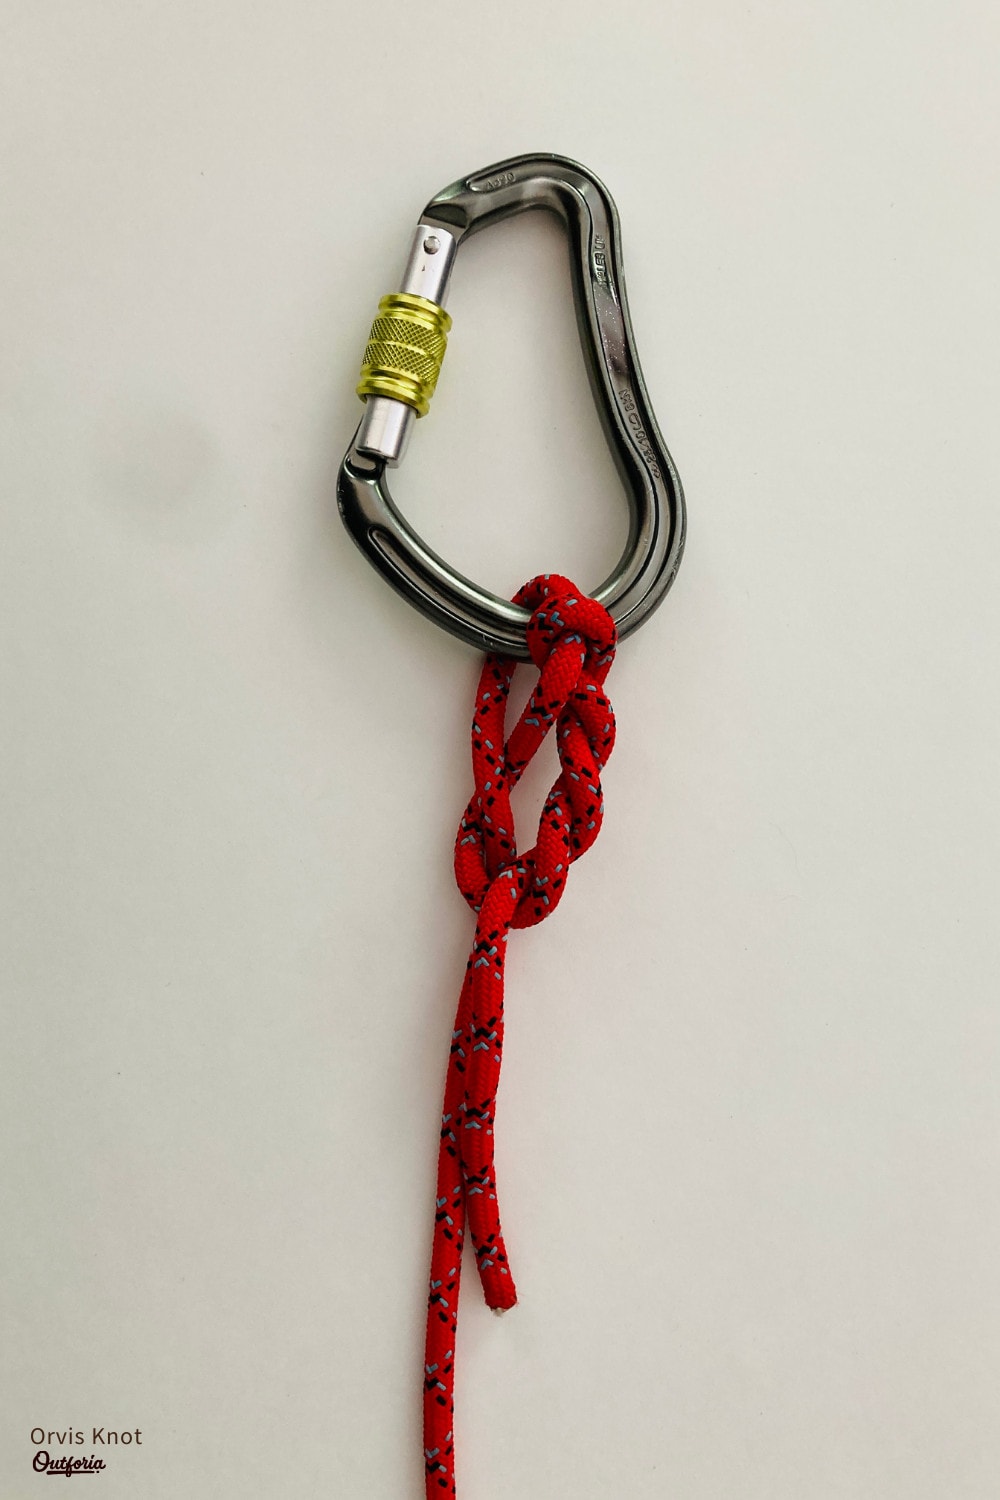
Use: Attaching a line to a fishing hook.
Pros:
- Relatively easy to tie
- Works well in thin lines
- Maintains much of a line’s breaking strength
Cons:
- Often tightens at an angle to the hook
Invented as part of a competition hosted by the Orvis Company, the so-called Orvis knot is a popular choice among anglers everywhere. This knot is ideal for use in thin fishing lines that need to be attached to a fish hook.
In many ways, the Orvis knot is similar to the Palomar knot, but the Orvis knot is popular because it’s relatively easy to tie. Additionally, the Orvis knot maintains much of a line’s original breaking strength, which is useful if you’re reeling in large fish.
If you want to practice tying the Orvis knot, you’ll need some cord and an object that you can loop around, like a carabiner.
To tie the Orvis knot:
- Thread the working end of the rope through the carabiner.
- Pass the working end of the rope under the standing end of the rope to create a loop.
- Thread the working end of the rope through the loop you created in step 2. This will create a second loop.
- Thread the working end of the rope twice through the loop you created in Step 3.
- Pull on the working end of the rope to tighten the Orvis knot. If fishing, trim the edge of the working end as needed.
20. Round Turn & Two Half Hitches
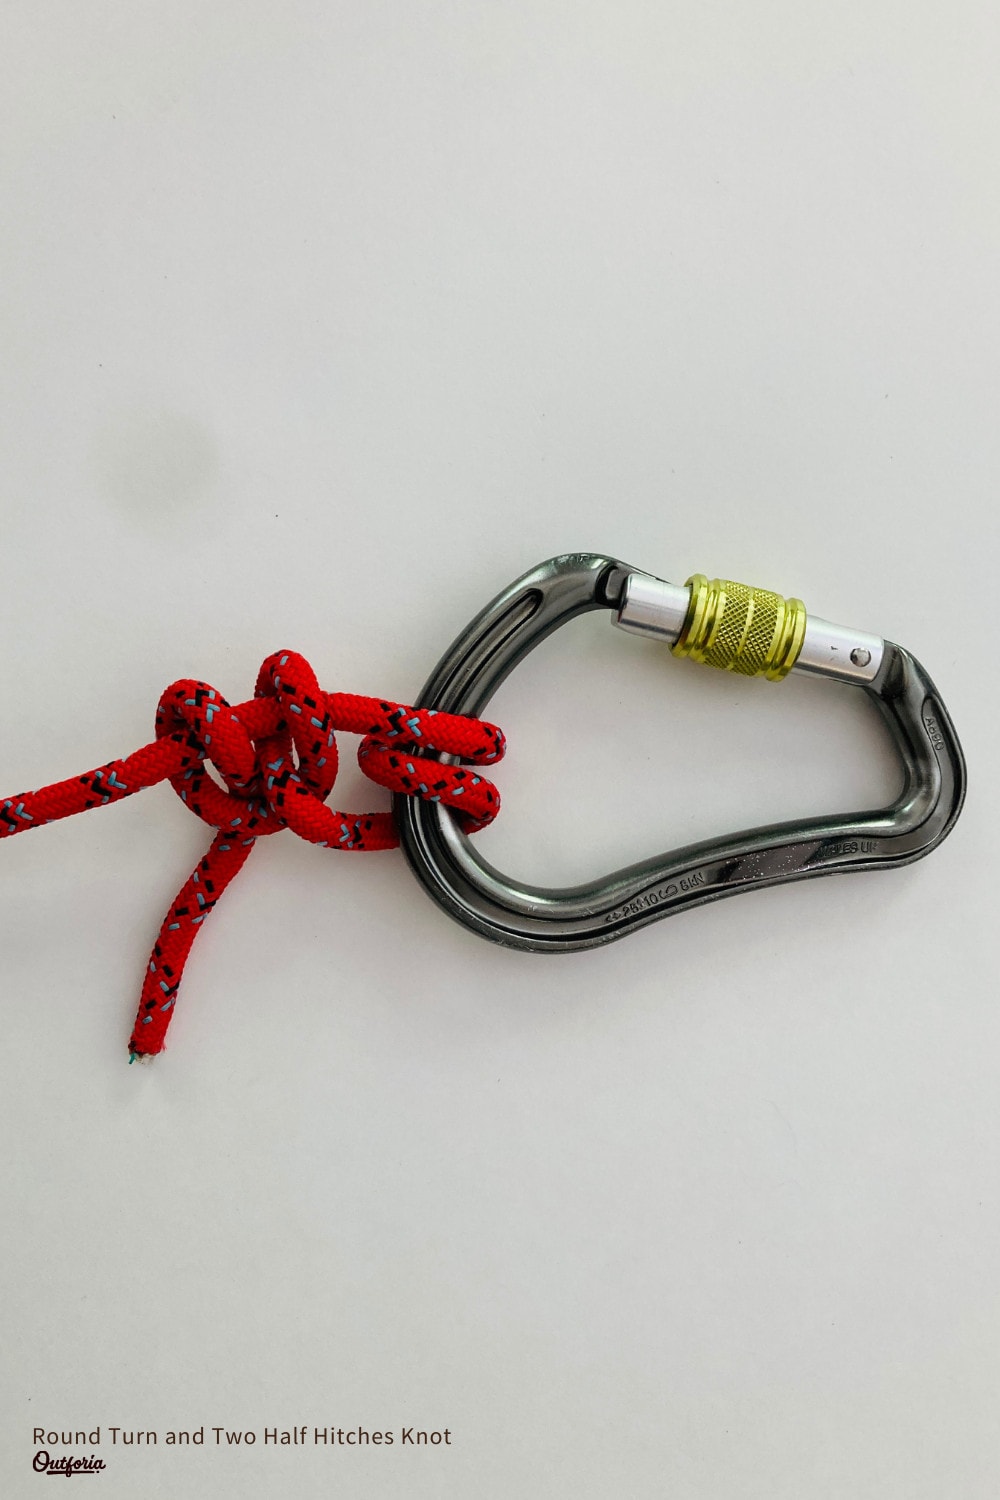
Use: Tying a rope to a post. Very popular for mooring vessels or even for securing fenders to the railing of a boat.
Pros:
- Simple to tie
- Surprisingly secure
- Can be tied while the line is loaded
- Easy to untie
Cons:
- Can loosen on itself
Another nautical classic, the round turn and two half hitches has long been used to tie up vessels to a mooring.
It is very popular because of its ease of use and the fact that it can be tied while one end of a rope is loaded. It’s also easy to untie after being loaded.
The only major downside to the round turn and two half hitches is that it can work itself loose if it is not under tension. However, in the case of a moored vessel, this is not very common.
The round turn and two half hitches consists of two parts: the round turn, and two half hitches. You will need rope and an object, like a post, to practice tying this knot.
To tie the round turn and two half hitches:
- Wrap the working end of the rope around the post two times. This is the round turn.
- Use the working end of the rope to tie a half hitch.
- Repeat step 2.
- Pull on the standing end of the rope to tighten and create the round turn and two half hitches.
21. Directional Figure Eight
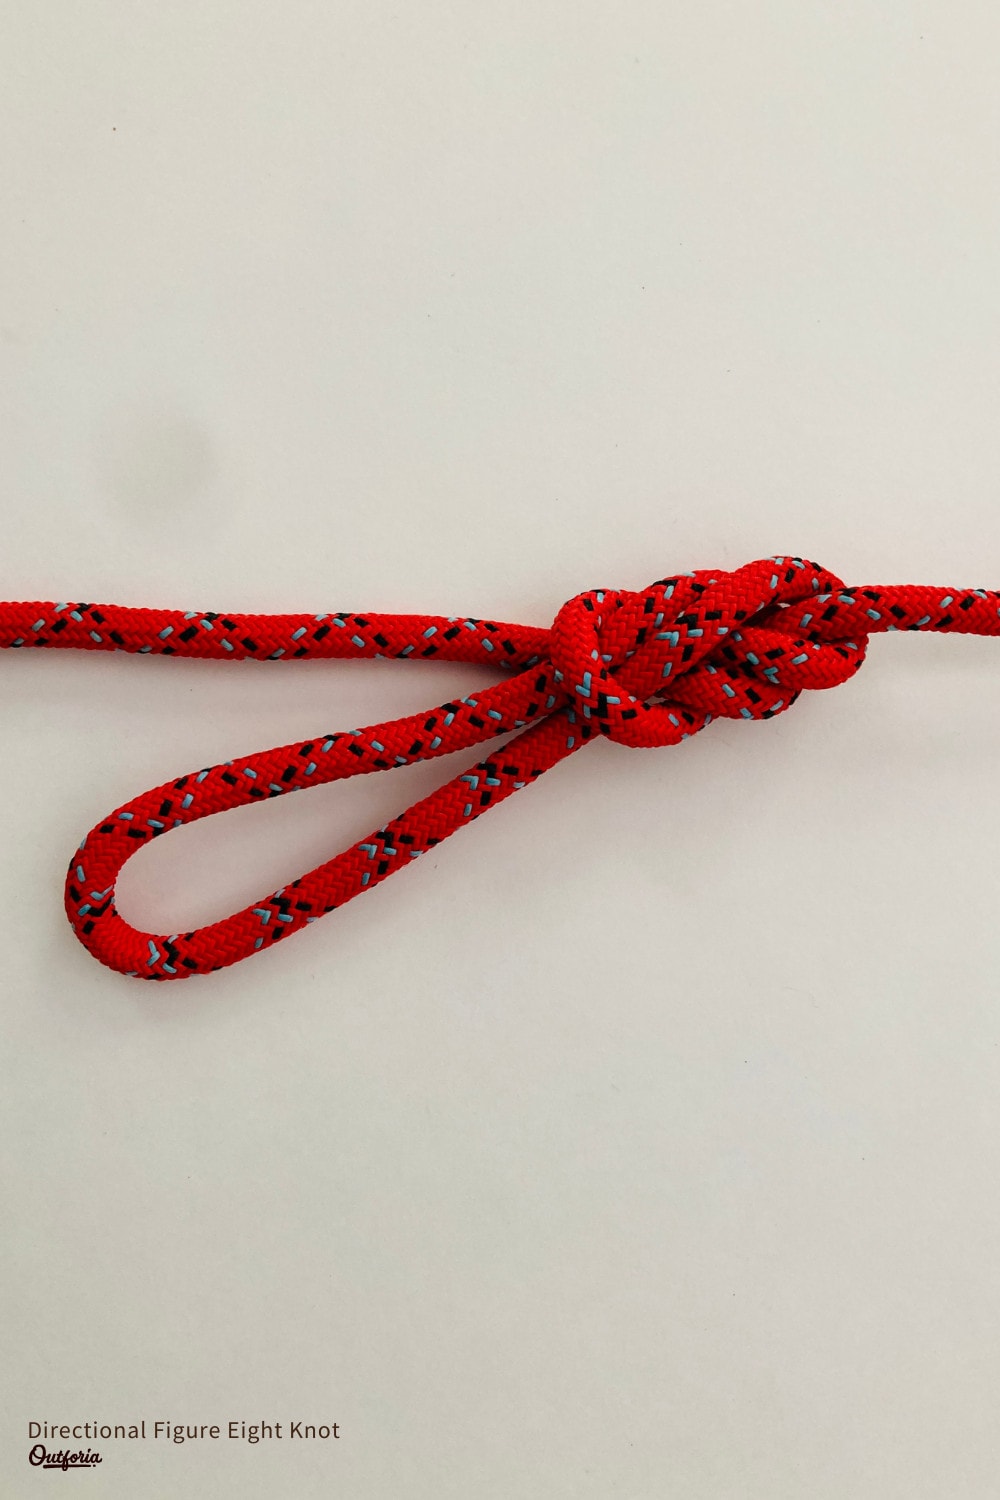
Use: Creating a loop in a rope that will be loaded from only one direction.
Pros:
- Relatively easy to tie
- Places less strain on the rope
- Fairly easy to untie after being loaded
Cons:
- Can fail when loaded in the wrong direction
The directional figure eight is a variation of the figure eight on a bight that’s useful in situations where you need to exert a load on the rope in only one direction.
This may seem like a very specific purpose, but the directional figure eight can place less strain on a rope when force is expected from only one direction. If you expect strain to come from more than one direction, an alpine butterfly knot is generally best. That’s because the directional figure eight can capsize and fail when loaded in the wrong direction.
To tie the directional figure eight:
- Create a loop of rope.
- Wrap the loop created in step 1 around the back of the standing end of the rope in the opposite direction of the anticipated load.
- Wrap the loop around the front of the standing end of the rope.
- Thread the loop through the opening in the rope in the direction of the anticipated load.
- Pull down on the loop and on each of the other strands of rope to tighten and create the directional figure eight.
22. Tensionless Hitch
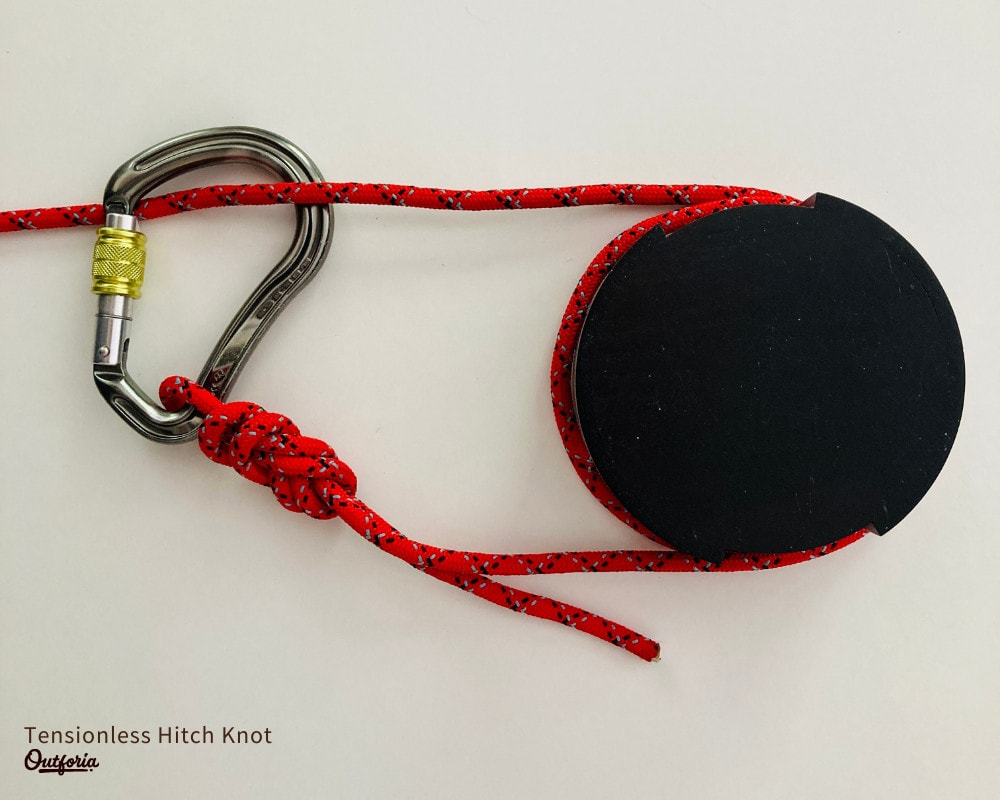
Use: To attach a line to an object, such as a post or tree. Can be used under load without a large reduction in the breaking strength of the rope.
Pros:
- Easy to tie
- Tightens on itself
- Very easy to untie after being loaded
- Can be used on very large objects
Cons:
- Requires a sizable object to tie
- Usually needs a carabiner
Popular among climbers and boaters, the tensionless hitch is a simple way to attach a line to a sturdy object. This hitch can be used to secure a loaded line or to prepare a tree anchor for toprope climbing when used correctly.
The main advantage of the tensionless hitch is that it is very easy to untie after being loaded. It also can be used if you need to gain control of a line that’s already loaded, such as when you’re tying up a boat.
Do note that you must find an object that’s at least 8 times the diameter of the rope that you use for this hitch. Otherwise, you may not get enough friction on the tensionless hitch to support a given load.
If you want to practice tying the tensionless hitch, you need a rope, a carabiner, and an object to tie the hitch around, like a tree or post.
To tie the tensionless hitch:
- Hold the working end of the rope.
- Wrap the working end of the rope around the object two times to create a round turn.
- Tie a figure eight on a bight on the working end of the rope.
- Clip a carabiner to the bight created in step 3.
- Attach the carabiner to the standing end of the rope.
- Lock the carabiner if necessary (required for rock climbing situations).
23. Zeppelin Bend
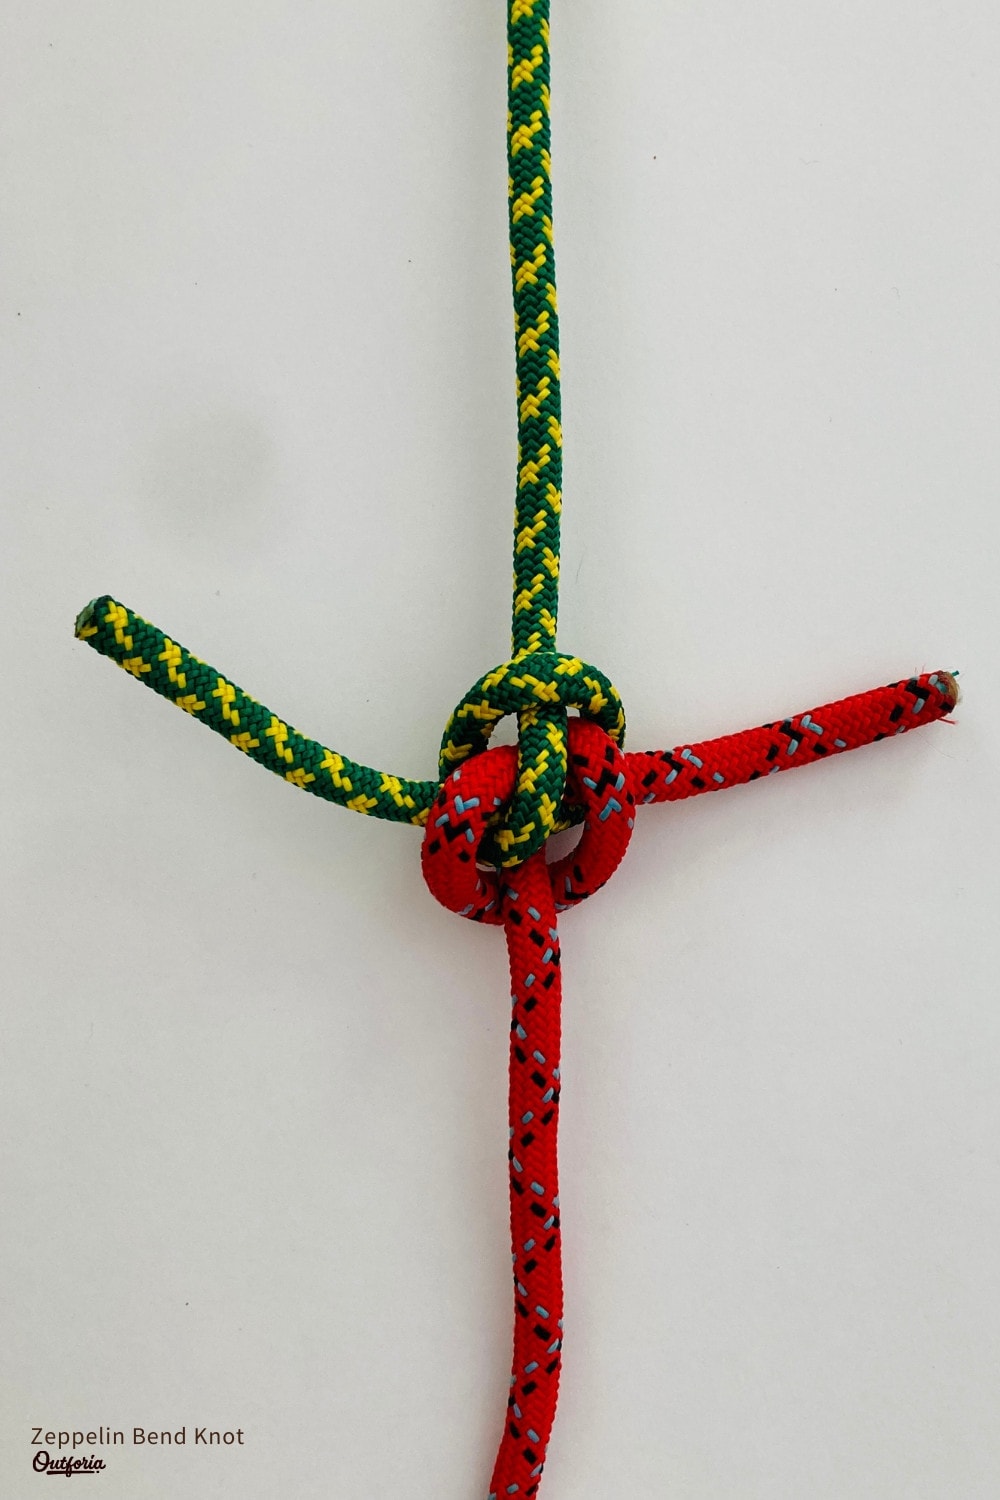
Use: Joining two ropes that will be loaded. Best if you need to avoid knot jamming that’s common with other bends.
Pros:
- Does not jam
- Easy to untie when unloaded
- Can’t be untied while loaded
Cons:
- Requires very long tails
- Somewhat difficult to tie
One of the less commonly used bends on our list, the zeppelin bend is a solid choice if you need to join two ropes together.
It is particularly beneficial if you need to load these two ropes but if you want to avoid the jamming that inevitably happens with the double fisherman’s. At the same time, because this knot tightens on itself, it can’t be untied while under load.
Even though the zeppelin bend is arguably superior to the double fisherman’s, it’s not as popular. This may be because the zeppelin bend is more difficult to tie correctly. However, like the double fisherman’s, the zeppelin also requires very long tails (think at least 8 inches/20 cm).
To tie the zeppelin bend:
- Hold two ends of rope—one in each hand. The strand in your right hand is Rope A. The strand in your left hand is Rope B.
- Create a bight in Rope A.
- Create a bight in Rope B.
- Place the bight of Rope B over the bight of Rope A. The tails of each rope should lie in opposite directions. The tail of Rope A should face up and to the right while the tail of Rope B should face down and to the left.
- Pass the tail of Rope A behind its standing end.
- Pass the tail of Rope B in front of its standing end.
- Thread the tail of Rope A through the bight of Rope B and then through the bight of Rope A.
- Thread the tail of Rope B through the bight of Rope A and then through the bight of Rope A.
- Pull on all strands to tighten and form the zeppelin bend.
24. Spanish Bowline
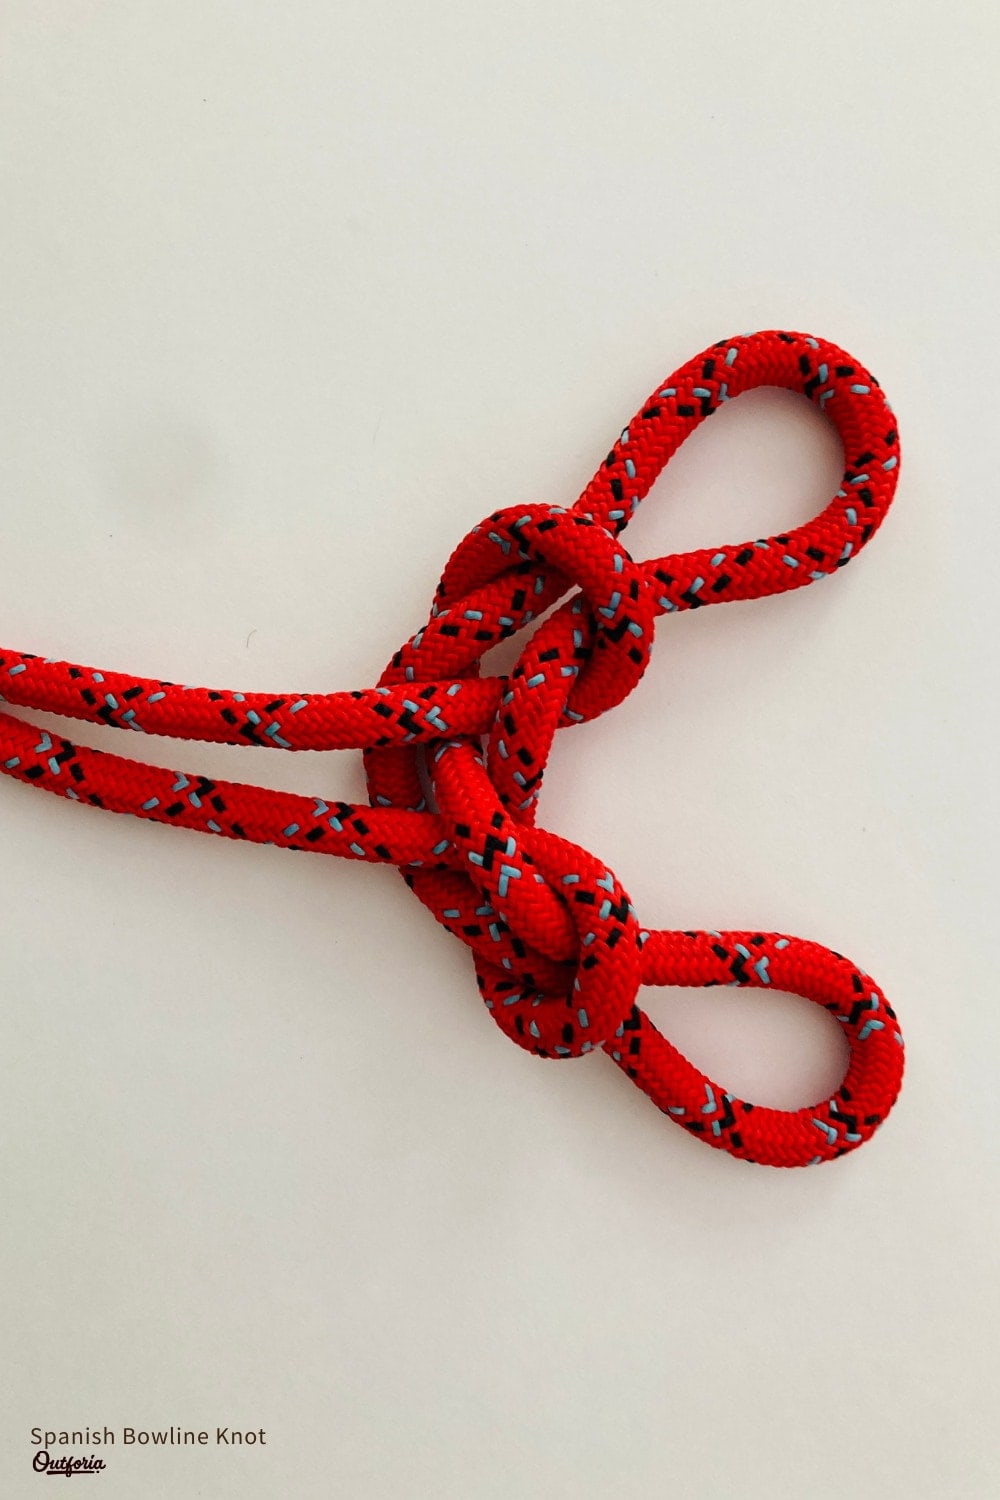
Use: Creating two loops in a rope. Can be used for an emergency harness, or to impress your friends.
Pros:
- Creates two loops
- Strong and secure
- Easy to untie after being loaded
Cons:
- Very complicated to tie
Another lesser-known knot, the Spanish bowline is a variation of the classic bowline that forms two loops.
It was traditionally fairly popular as part of an emergency harness in rescue situations, but it is also useful whenever you need to create two loops in a rope. It’s also a pretty knot that you can use to impress your friends.
While the Spanish bowline is easy to untie after being loaded, it is very complicated to tie. With some practice, most people find they can tie this knot with relative ease, but it’s difficult to get right the first time around.
To tie the Spanish bowline:
- Create a loop in the rope.
- Fold the loop backward and tuck it under the rope’s standing ends.
- Fold one half of the left loop over itself and to the right.
- Fold one half of the right loop over itself and to the left. This should create a butterfly-like shape in the rope with two upper and two lower loops.
- Tuck the lower left loop through the upper left loop.
- Tuck the lower right loop through the upper right loop.
- Pull both loops tight to create the Spanish bowline.
25. Trucker’s Hitch
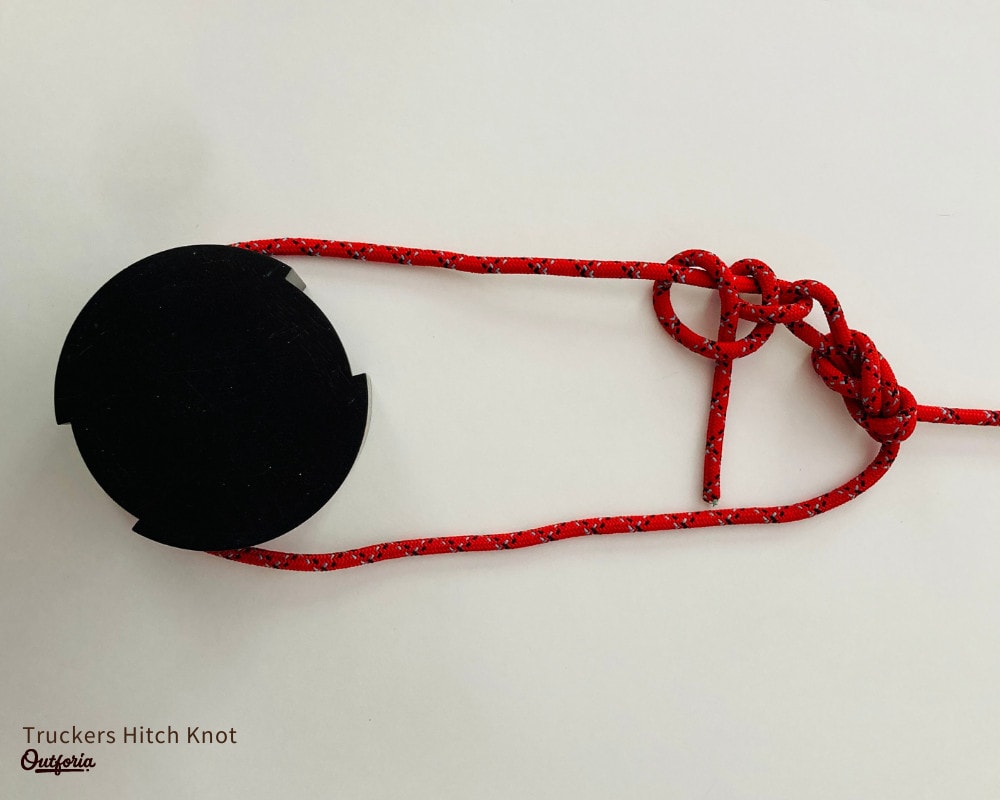
Use: Creating quick-release tension on tarp and tent guylines.
Pros:
- Quick release system under tension
- Can theoretically provide mechanical advantage
Cons:
- Less easily adjustable than the rolling hitch
The trucker’s hitch is a commonly-used hitch for tensioning lines in a wide variety of situations. As its name suggests, it has long been used by truckers to secure loads and tarpaulins. It’s also useful for camping if you need to tighten guylines on tents and tarps.
In theory, the trucker’s hitch can provide a small amount of mechanical advantage, allowing you to tighten a guyline more efficiently than you would be able to without it.
It also provides an easy-to-release system, even when the line is under load. This makes it ideal for use on guylines in windy conditions. However, the trucker’s hitch is somewhat less easy to adjust than the less common rolling hitch.
If you want to tie a trucker’s hitch, you’ll need a line and an object to anchor it to. It’s best to practice this with a small amount of weight pulling on the opposite end of the line, like you would experience while pitching a tent. In our instructions, we’ll describe how to tie this hitch as if you were tightening the guyline on a tent.
To tie the trucker’s hitch:
- Create a figure eight on a bight or a directional figure eight in your line, about 2 feet (60 cm) from your anchor point.
- Wrap the working end of the rope around your anchor point.
- Thread the working end of the rope through the bight you created in step 1.
- Pull the working end of the rope back toward the anchor point until you achieve the appropriate tension.
- Create two half hitches below the bight to finish the trucker’s hitch.
You may also like: How To Read A Compass: Expert Tips For Successful Navigation
Knot vs Hitch vs Bend: What’s in a Name?
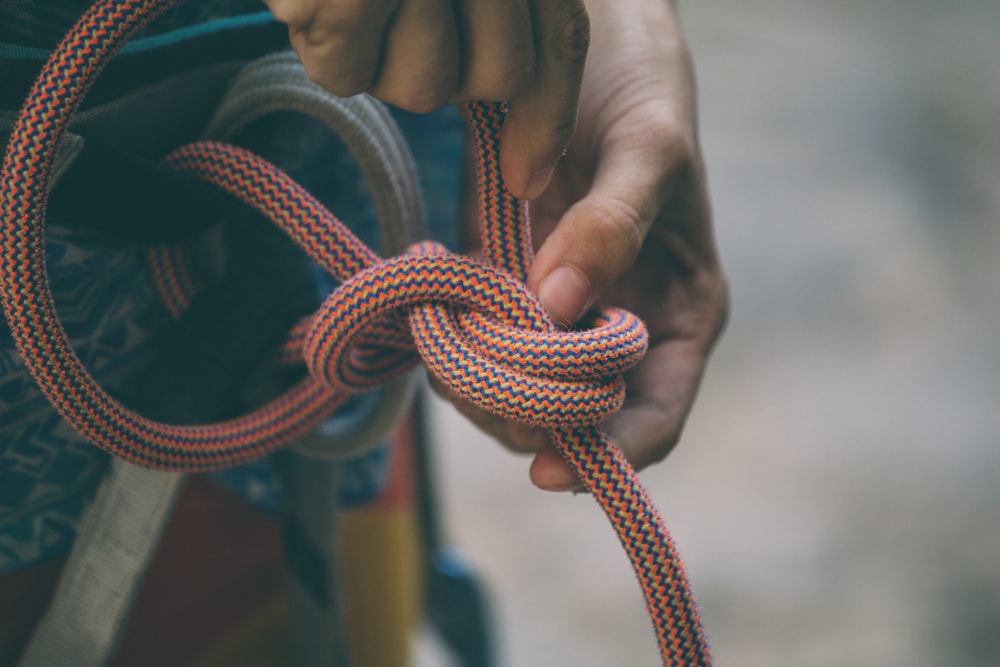
In this article, we’ve used the words “knot,” “hitch,” and “bend” seemingly interchangeably. But there’s a technical difference between these three techniques.
While we used these words interchangeably in some of our directions for simplicity’s sake, it’s worth knowing the difference between these terms before you embark on your knot-tying career. Here’s what you need to know:
- Knot – A true knot is something tied into a line, rope, or webbing that can hold its own form without needing to be wrapped around another line or another object. Example: figure eight knot.
- Bend – A technique used to join two ropes, lines, or webbing. Example: Carrick bend.
- Hitch – A knot that must be tied around another rope or an object in order to hold its form and shape. Example: Clove hitch.
There you have it, folks. A knot is not a knot if it cannot exist on its own. If you want to keep things simple, you can use the word “knot” as an umbrella word for all of these terms. Or, you can refer to “true knots” as “hard knots” and use the words “bend” and “hitch” as defined above.
You may also like: Multiple Strands, Multiple Uses: What Is Paracord?
Types of Knots FAQs
Here are our answers to some of your most commonly asked questions about the different types of knots.
How many different types of knots are there?
There are thousands of different types of knots out there, many of which are infrequently used. Although it’s impossible to know all the knots that have ever been used by humans, The Ashley Book of Knots, which is a knot encyclopedia, lists over 3,850 knot types.
What is the hardest knot to tie?
Everyone’s knot tying experience is different, so there’s no one knot that’s universally considered to be the hardest knot to tie. As a general rule, decorative or ornamental knots, such as the monkey’s fist knot, are often the most difficult to tie.
What’s the normal knot called?
A so-called normal knot is actually an overhand knot. This is one of the most commonly used knots in the world. It’s a knot that many of us learn to tie as children, even if we don’t know its proper name.
What is the strongest knot?
Knots are not rated on their “strength” in the same way that we might rate the strength of an iron beam. Rather, knots are rated based on how much they decrease the tensile strength of the material that they’re tied in.
For example, the overhand knot can reduce the strength of a rope by up to 75%. Meanwhile, one of the strongest knots, the Palomar knot, reduces the strength of an unbraided line by only about 5%.


