
Just because you’re out in the woods doesn’t mean you have to eat everything from a can. With a little planning and prep work before your next camping trip, you can be dining in style in the great outdoors, even though there’s no fridge. We’ve put together the best tricks to keep food cold when camping without sacrificing quality and taste.
Benefits of Keeping Food Cold While Camping

Really, this comes down to freshness and quality. It might be fun to try the dehydrated food packs designed for backpacking and camping once or twice, but you don’t have to rely on astronaut food just because you’ve made the great outdoors your home for the night.
With proper planning, keeping your food cold when camping allows you to eat real food without relying on heavily processed, pre-packaged food. This opens you up to healthier food options and even makes it easier to cater to food sensitivities and speciality diets.
With a functioning cooler, your camping meals can include meats, dairy, produce, and even pre-made frozen meals to make mealtimes even easier.
Importance of Keeping Food Cold When Camping

Food safety is key regardless of whether your kitchen is inside or outside. Food poisoning is no joke, especially when you’re out camping!
Here are a few food safety tips to keep in mind.
The biggest food safety concern is keeping raw meat and other perishable foods safe until it’s time to cook.
The ideal temperature to store fresh meat is below 40 °F (4.5 °C), with perishability increasing at every degree above that. If you’ll be packing fresh, raw meat for your camping trip it’s vital to keep your cooler consistently below 40 °F (4.5 °C).
We’ll talk about the best ways to keep a cooler cold below, but there are a few additional food safety steps you can take.
First, double wrap any raw meat in freezer bags to prevent cross-contamination. You can also pack your cooler in layers, with the items that need to stay the coldest (like meat and other frozen food) at the bottom and food that doesn’t need to be as cold or is delicate (fresh greens and other fruits/veggies for example) at the top.
You May Also Like: Find Out What Camping Cooking Equipment You MUST Bring To Have An Amazing Camping Experience!
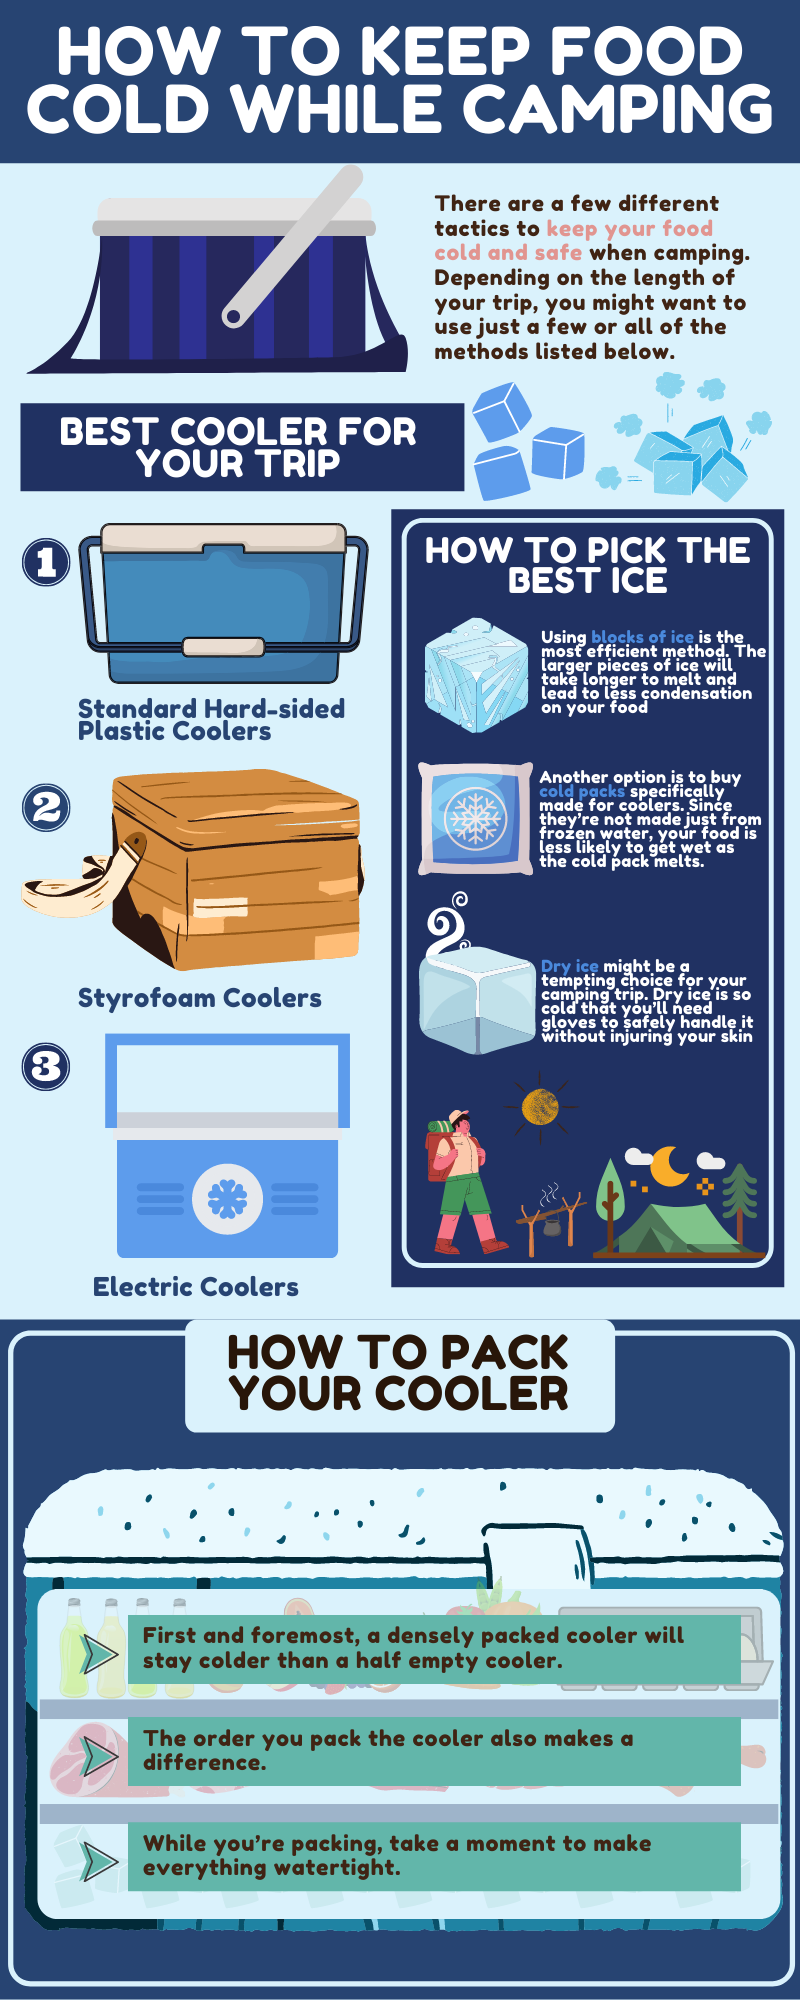
Share This Image On Your Site
<a href="https://outforia.com/how-to-keep-food-cold-while-camping/"><img style="width:100%;" src="https://outforia.com/wp-content/uploads/2022/01/How-to-keep-food-cold-while-camping-infographics-01192022.png"></a><br>How to keep food cold while camping Infographic by <a href="https://outforia.com">Outforia</a>You may also like: What Is Pemmican? The Meatrimony Of Jerky And Granola Bars
How to Keep Food Cold While Camping: Three Simple Ways

There are a few different tactics to keep your food cold and safe when camping. Depending on the length of your trip, you might want to use just a few or all of the methods listed below.
1. Using a Cooler and Ice
The Best Cooler Type for Your Trip
With the exception of backpacking or thru-hiking, using a cooler and ice is likely the best way to go. There are a few different types of coolers to choose from to keep your food cold when camping.

Generally, the standard hard-sided plastic coolers are most effective for camping. The thick walls have enough insulation to keep food safe and the variety of sizes allows you to find the right fit for the length of your trip.
Most plastic coolers were made for outdoor use and have features like handles and wheels for easier use while camping. Hard-sided outdoor coolers can be found at general box stores and at outdoor-specific stores, with popular brands including RTIC, Coleman, Stanley, and Yeti.

Styrofoam coolers are another option, but should be used sparingly. Styrofoam coolers aren’t as efficient as the hard-sized plastic coolers and therefore aren’t recommended for longer trips.
Styrofoam coolers can be found at most grocery stores and gas stations, so they may be easier to find when you’re already on the road. While styrofoam coolers don’t work quite as well as hard-sided plastic coolers, they’ll still do the job for short trips.
If you want to go all out with your car camping setup or will be out for quite awhile, you might consider an electric cooler. Electric coolers come in a wide range of functionality and price, from rechargeable batteries to solar power and even coolers that plug into your car.

Electric coolers act just like a fridge on the road, with some having freezer capabilities as well. If you’re a frequent car camper an electric cooler might be worth the investment. However, these models can be expensive and heavy, so they’re not necessarily a good fit for all camping styles.
Choosing the right sized and shaped cooler for your trip is important because a half-full cooler won’t work as efficiently as a well-packed, full cooler will. If the amount of food you’re bringing is fairly small, an insulated cooler bag might be all you need.
You can find these bags at most grocery stores and box stores. Even though they’re insulated, the thinness of the fabric makes these cooler bags the least efficient option.
2. Picking the Best Type of Ice
How To Pick The Best Ice

You might think that any ice will do, but there are a few things to keep in mind if you want to keep your food as cold as possible. It’s easy to stop at the store and grab a bag of ice cubes, but this is actually one of the most inefficient methods.
Small ice cubes not only melt faster, but you’ll end up with a cooler full of water and potentially soggy food as the ice melts. If small ice cubes are all you have access to, be sure to double bag the ice in freezer bags to prevent leaks and allow for more efficient packing. You can also double bag food items to prevent spoiling.

Using blocks of ice is the most efficient method. The larger pieces of ice will take longer to melt and lead to less condensation on your food. You can repurpose gallon jugs or other medium-sized kitchen containers to become ice blocks by filling them with water and freezing before your trip.
By holding water inside something else before freezing it, you can reduce the likelihood that your food will become soggy as the ice block melts. Be sure to give plenty of time for your ice blocks to freeze solid before packing your cooler.

Another option is to buy cold packs specifically made for coolers. Generally made of plastic filled with a freezable liquid or gel, these cold packs are designed to freeze quickly and stay frozen for longer. You can make your own cold packs by filling ziplock bags with ice and freezing them flat to create blocks.
Since they’re not made just from frozen water, your food is less likely to get wet as the cold pack melts. Cold packs are also reusable. If you’re an avid camper, you can purchase cold packs that fit your cooler once and reuse them for every trip.
When choosing the right cold pack, keep in mind the shape of your cooler. Flat ice packs or blocks can be a good choice for most situations, as they are easy to layer in your cooler and provide more surface area than other shapes.

Dry ice might be a tempting choice for your camping trip. After all, dry ice freezes at a temperature of -110°F (-79°C), keeping everything much colder than regular ice at 32°F (0°C). But there are some safety precautions to consider before purchasing dry ice for your next camping trip.
Dry ice is so cold that you’ll need gloves to safely handle it without injuring your skin. It also releases gas rather than water as it warms up. This means your food won’t get wet, but there will be a build up of carbon dioxide in your cooler.
You can crack the cooler to prevent the gas from building up, but you will need to store the cooler in an open space (not in an enclosed car) and away from your tent or camper. Dry ice lasts long at a rate of about ten pounds in twenty-four hours. Even though dry ice is a colder temperature than regular ice, it doesn’t necessarily work better at keeping your food cold while camping.
3. Frozen Food

You might consider freezing some of your food before leaving home. This is a good option for raw meat so you don’t have to worry about spoiling and contamination. You can even purchase frozen meals from the grocery story that just need to be heated, making packing and cooking even easier for your camping trip.
Each frozen food item not only stays safe and cold, but also helps the rest of the cooler stay colder. Just remember to allow time to defrost as necessary to still be able to cook and enjoy your food!
You May Also Like: Here Are The Top 7 Tips For Using Dry Ice For Camping That You Need To Learn!
How To Pack Your Cooler

This step might seem unnecessary but can actually make a big difference in the temperature of your cooler.
If you’ve packed all the food you need and there’s still room in the cooler, fill the space. Take this opportunity to pack more drinking water, freezing a few bottles to keep the temperature as low as possible. You can even make a few more cold packs to fill the space at the top of the cooler.
Pack food that needs to stay coldest, like raw meat and frozen meals, at the bottom of the cooler. Move up in layers, putting more perishable items like meat and dairy towards the bottom and more delicate items like produce towards the top. By putting cold packs or ice blocks between each layer you can keep the temperature as low as possible.
If you’re using cold packs it’s less likely that your food will get wet while the ice melts, but this is a time to be better safe than sorry. When in doubt, use a freezer ziplock bag (or two) to keep your food items dry.
You May Also Like: Be Organized With These 26 Gear Storage Ideas For Camping
How To Keep Ice From Melting As Long As Possible While Camping

As we mentioned above, larger pieces of ice will stay frozen longer than smaller pieces of ice, so use ice blocks instead of cubes to prolong the melting process. Cold packs can defrost at different rates than ice blocks, so using a combination of the two might be your best bet to keep everything frosty.
It’s important to pre-chill your cooler before packing. Even with the best ice blocks and layering techniques, if you put cold food in a warm cooler you’ll lose the chill before you even begin as the cooler comes to temperature.
Give your cooler twenty-four to forty-eight hours to fully pre-chill. Because of convenience, bags of ice cubes are a great way to pre-chill your cooler. You can throw the whole bag of ice in the cooler, and close the lid tightly. Leave the cooler closed for a day or two, drain the melted ice, and you’re ready to pack!
The final tactic to prevent ice from melting is to keep the cooler cold. Start by keeping the cooler in the shade as much as possible, and open the cooler as little as possible. Opening the cooler lets cool air out and warm air in, which will speed up melting. You might consider having two coolers to solve this issue.
Treat the first cooler like a freezer, packed tight with the food that needs to stay as cold as possible and packed to the brim with ice. Use the second cooler like a fridge, filled with drinks, snacks, and other food you’ll access more often. By opening the ‘freezer’ cooler less often, you can keep the ice from melting for as long as possible.